
Eclipse 2024
For three and a half minutes mid-afternoon on April 8, 2024, the sun over a band of upstate New York disappeared behind the new moon, resulting in a total solar eclipse. Totality was shockingly brief, but well worth the drive.
Preparation
This may be a once-in-a-lifetime event, so I wanted to make the most of it. I very highly recommend the educational videos and app created by PhotoPills. The step-by-step guide detailed the astronomy of eclipses, where and when to see it, and especially how to photograph it.
I used the app to determine an optimal place to view the eclipse, and visited the site to use the augmented reality feature to visualize the image. In the end, I decided to forego the picture in order to enjoy the experience with my people… I wouldn’t have traded it!
Packing List
Eclipse glasses recommended by the American Astronomical Society.
Nikon D750, a full-frame 24 megapixel SLR
Tamron A022, a 150-600mm zoom lens
Tamron TC-X14, a 1.4x teleconverter
NiSi Solar Filter, a 16.6-stop neutral density filter

A pier on Lake Champlain aligned perfectly with totality.
Eclipse Mania
Towns in the path of totality really embraced the eclipse fever! I loved seeing the local spirit.


Mad Science
We were joined by some brainiacs from MIT’s Haystack Observatory, who set up equipment to measure proton flux in the ionosphere. Incredibly sensitive GPS receivers transmitted live data in order for scientists to monitor changes as part of a series of eclipse projects. (At the end it reads, “amateur participants who are hosting these receivers”… that was us! What a trip!)
Read more about the project at sciencesprings, and view the data at Haystack’s project site.


On the Way to Totality


Totality panorama by Becky Pineo.
Totality was breathtaking. Mind-scrambling. Shocking. Tear-jerking.
Where to Next?
Maybe Snæfellsjökull National Park, Iceland… in 2026, totality there will last 2 mins 10 seconds, and hover only 25 degrees above the western horizon. The challenges of photographing there make me feel extra fortunate we enjoyed such a good show here in New England.
Maybe Australia in 2028.
San Francisco
Three trips in one:
A long weekend in Sonoma & Napa
A few days in Carmel & Big Sur
Exploring San Francisco


Barn Board and Fireplace
A barn board feature wall and electric fireplace adds warm ambiance to cold New Hampshire winters.
I knew as soon as I saw the living room that it needed a fireplace. I went through a few iterations, and ultimately decided to forego the lofty daydream of vaulted ceiling and skylights in favor of saving for early retirement and avoiding the glare on the TV.


What I didn’t know what what a pain in the butt it would be to vent it. The carport is just beyond this wall, and there are windows to the side, so the only solution would have been to punch a new chimney through my new-ish 50-year warranty roof. I’d really rather not. So: electric.
Leveling And Re-Leveling
Ugh, this was a pain. Of course my ceiling is not level… that would be too easy. Working above my head and on a stepladder, holding an 8-foot board and the level with one hand and the drill and screw in the other proved to be challenging. When the top row seemed to be level and straight, the second row proved that it wasn’t. Level actually turned out to be about 3/4” off from the slope of my ceiling.


Pull it down. Rip at an angle. Put it up again. And again. CRAP. Again. Well, close enough. Barn board isn’t supposed to be perfect.

I knew roughly the size of the fireplace I wanted, but needed to decide on the exact model before framing out the base cabinet.
Shopping and Procrastinating
Most electric fireplaces look like two-dimensional cartoon renderings of the Pits of Hades. Typical New Englanders use fire in their homes for survival… you know, to prevent us from having to climb inside the carcass of a newly-dead tauntaun. The idea of paying decent coin just to have it look pretty is absurd.

Dimplex IgniteXL

Modern Flames Spectrum Slimline
The selection of electric fireplaces is minimal. The selection of realistic-looking electric fireplaces is non-existent. And then I began my online obsession with Trevor.
Blazing Embers
Let me introduce you to Trevor’s YouTube channel. If you know me, you know I don't give a rats ass about online personalities or influencers or anyone else telling me what I should buy and how I should decorate. But Trevor’s videos offer up-close and in-depth looks at the features and aesthetics of the fireplaces, which is especially important because his shop - Embers Living - is thousands of miles away.
Modern Flames Orion Slim
Well, this one does the trick: the Orion by Modern Flames. It’s got a high-definition display combined with three-dimensional base (log & glass) media that combine to make a darn good looking fake fire. There are sparks and smoke and crackling noises, all without the actual bother of firewood, backdrafting, and cleaning out ashes. I opted for the Slim version, since I don’t need a multi-sided display, I benefit from having the black bezel cover the cut edges of the barn board, it’s not as deep, and it’s a decent amount cheaper.
I debated flying to Denver to see the units in person, since I know how misleading marketing videos can be. But after talking on the phone with a super-helpful employee (who even took a few additional videos for me), I bit the bullet. Also, it turns out that Independence Day is a good time of year to look for sales on fireplaces. It arrived in just a couple of days.

Base Cabinet
Now that I’d bought the fireplace insert, I could start work on the frame. I treated myself to a laser level, and was delighted to see that my prior work wasn’t half bad.
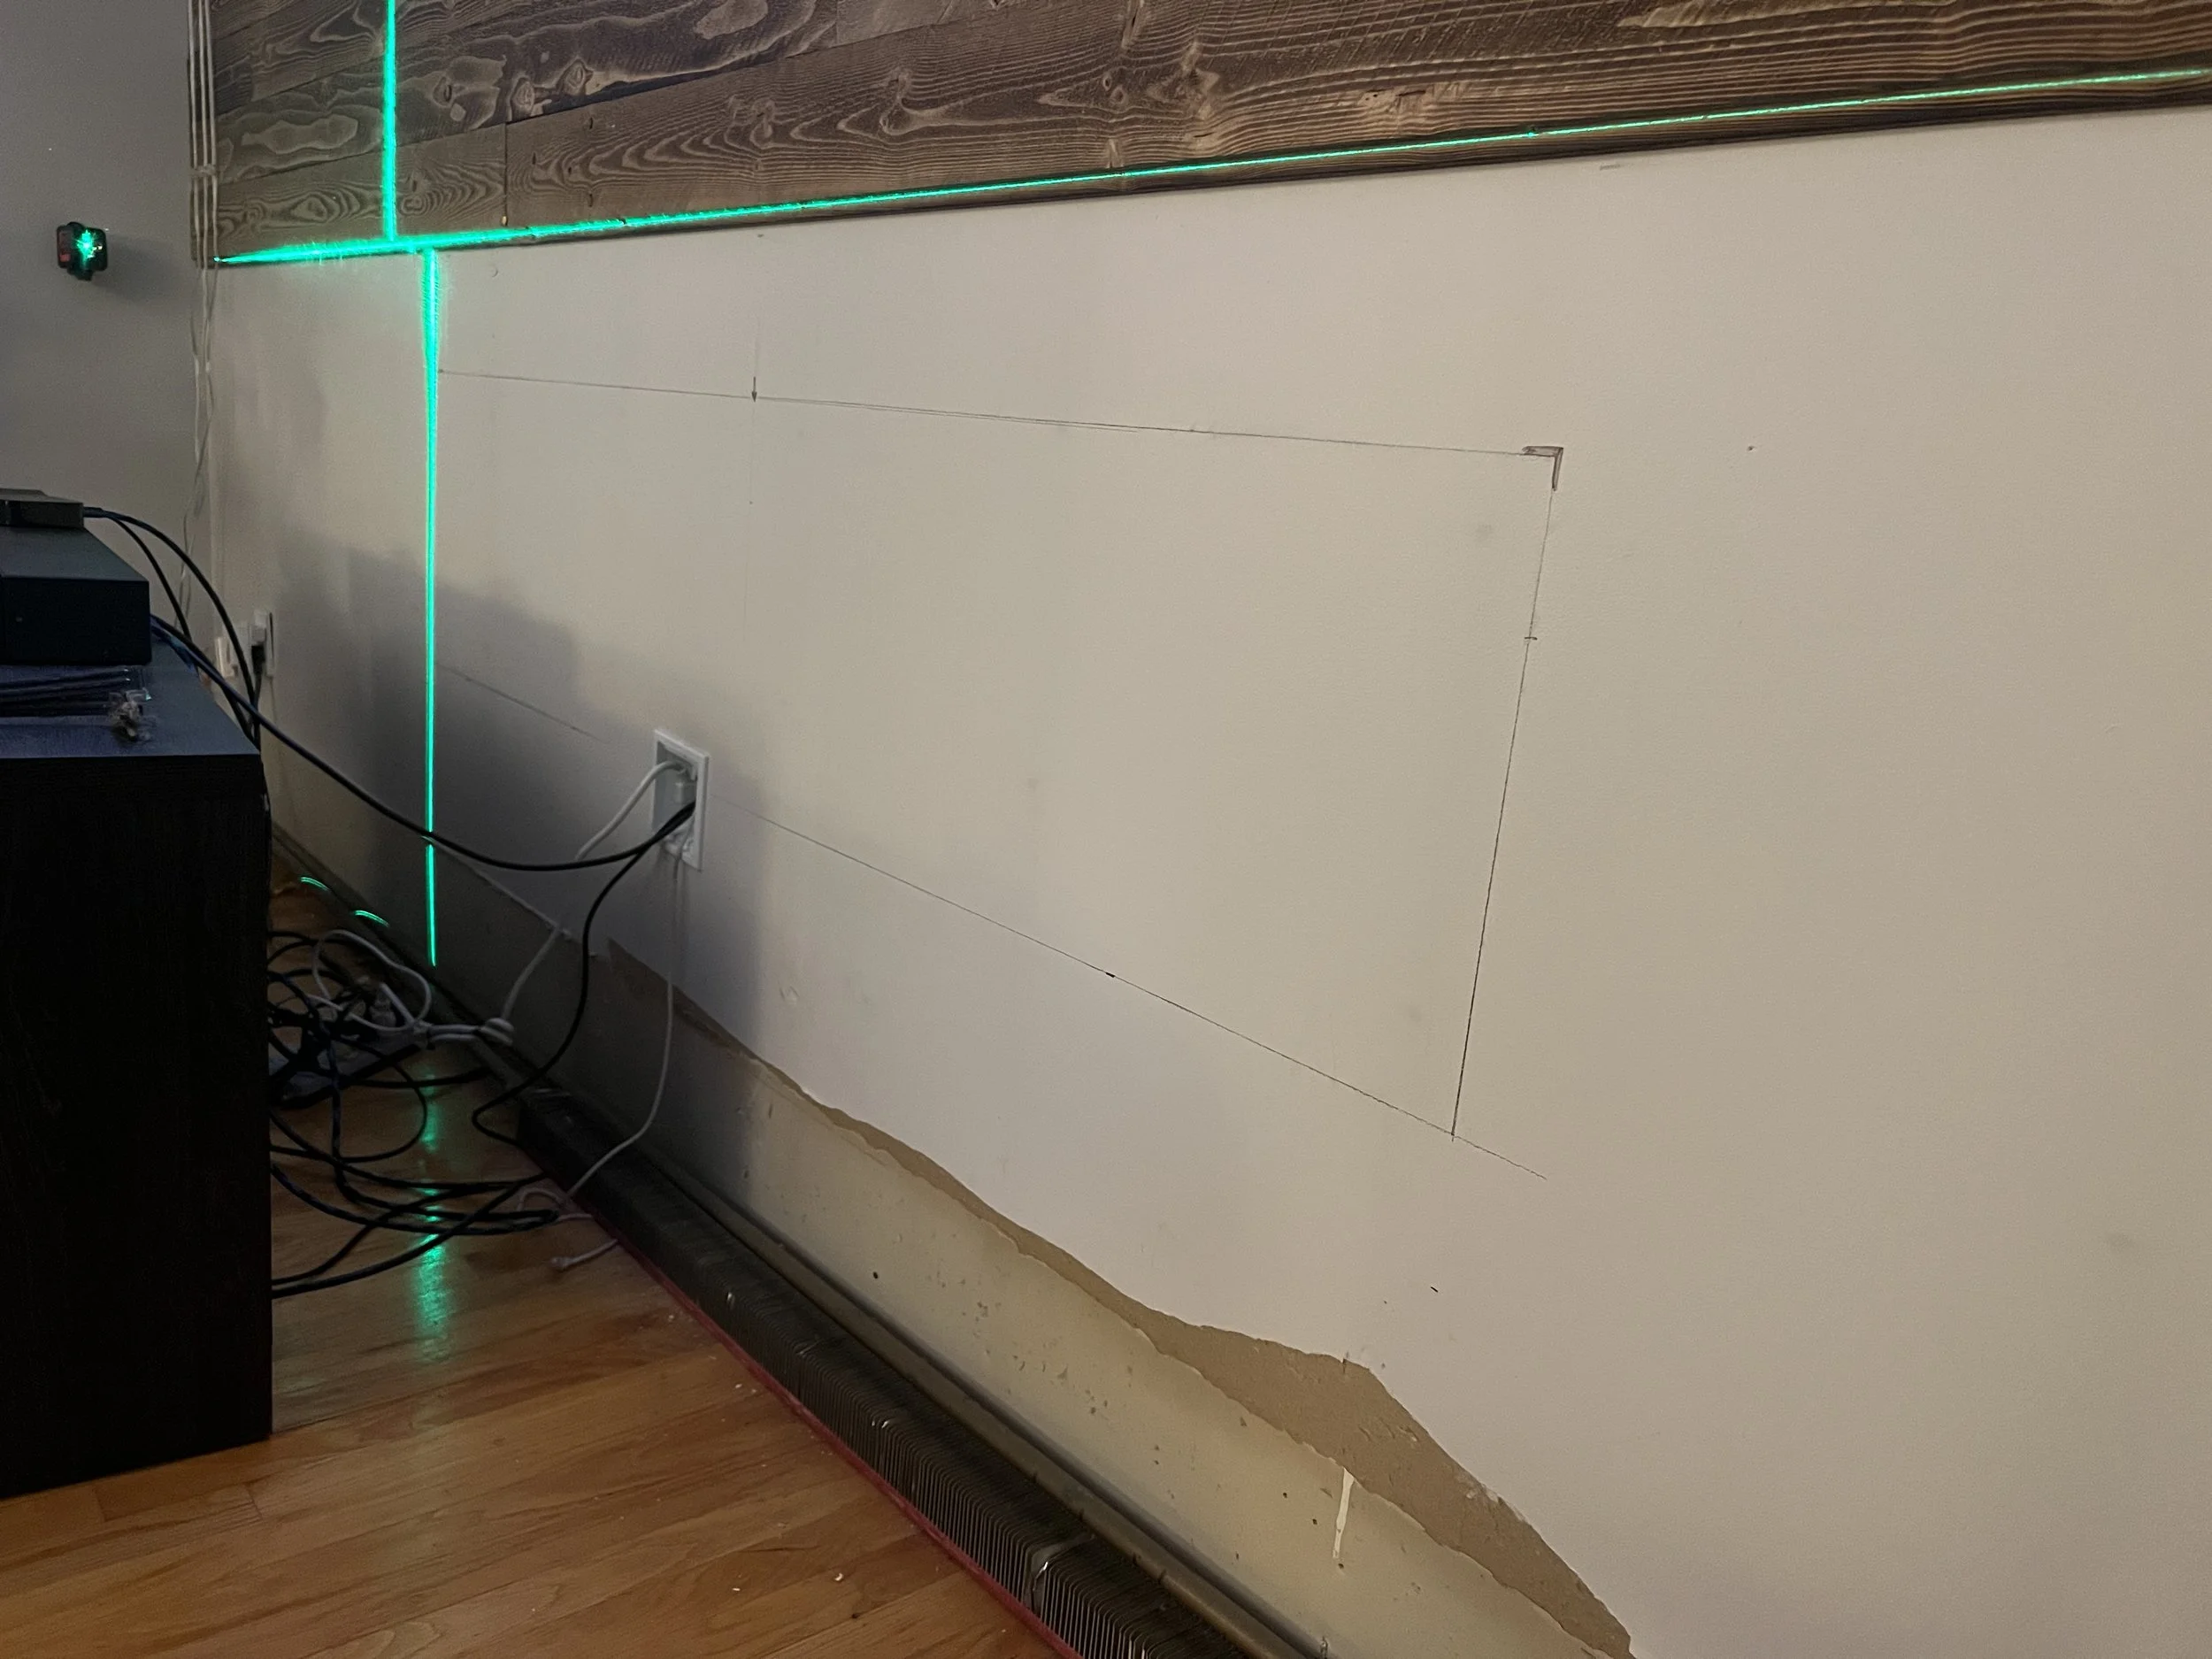
I built the frame intentionally off-center, to account for the asymmetry of my living room. I also planned to create a vent at the bottom with insulation preventing the baseboard heat from rising up into the cabinet. I ended up not needing to vent it (more on that when I explain the demise of my oil boiler), so I left the bubble insulation and auto-grille mesh in place, but covered by barn board. It’ll be a nice mystery for the next homeowner to solve if they ever open up the cabinet.


Nearly Done
My air conditioner is on full-blast, and I’m sitting in front of the fire. I love it already.

Mantle Plans
My initial plan was to get custom-cut soapstone blocks, 18” wide, 13” deep, and 1.5” thick. Heavy, but not so big I can’t lift them up to reach the electrical cords inside. I built my fireplace frame with blocks every 18” to make sure the stone is supported on three sides. They can be cut with such a precise square corner that I can set them in place touching, and not have to grout the cracks.
I might still do stone someday. But with other budget priorities, I figured I’d get a placeholder material so at least my plants have a place to sit.
I stopped by a local lumber yard that carries beefy rough cut boards. After a couple coats of semi-transparent stain, the board set in place, and now I love it so much it might live there forever.


Farmhouse Kitchen example from the showcase of Vermont Soapstone Company.


Plant Corner
I love the concept of creating an airy living room with vaulted ceilings and large skylights, but honestly the likely price tag is just more than I’m ever likely to deal with. Plus, more heat in the summer, cold in the winter, and a glare on the TV. (Can you tell I need to talk myself out of this idea?)
What problem am I really trying to solve, anyway? Light. More precisely: plant light.
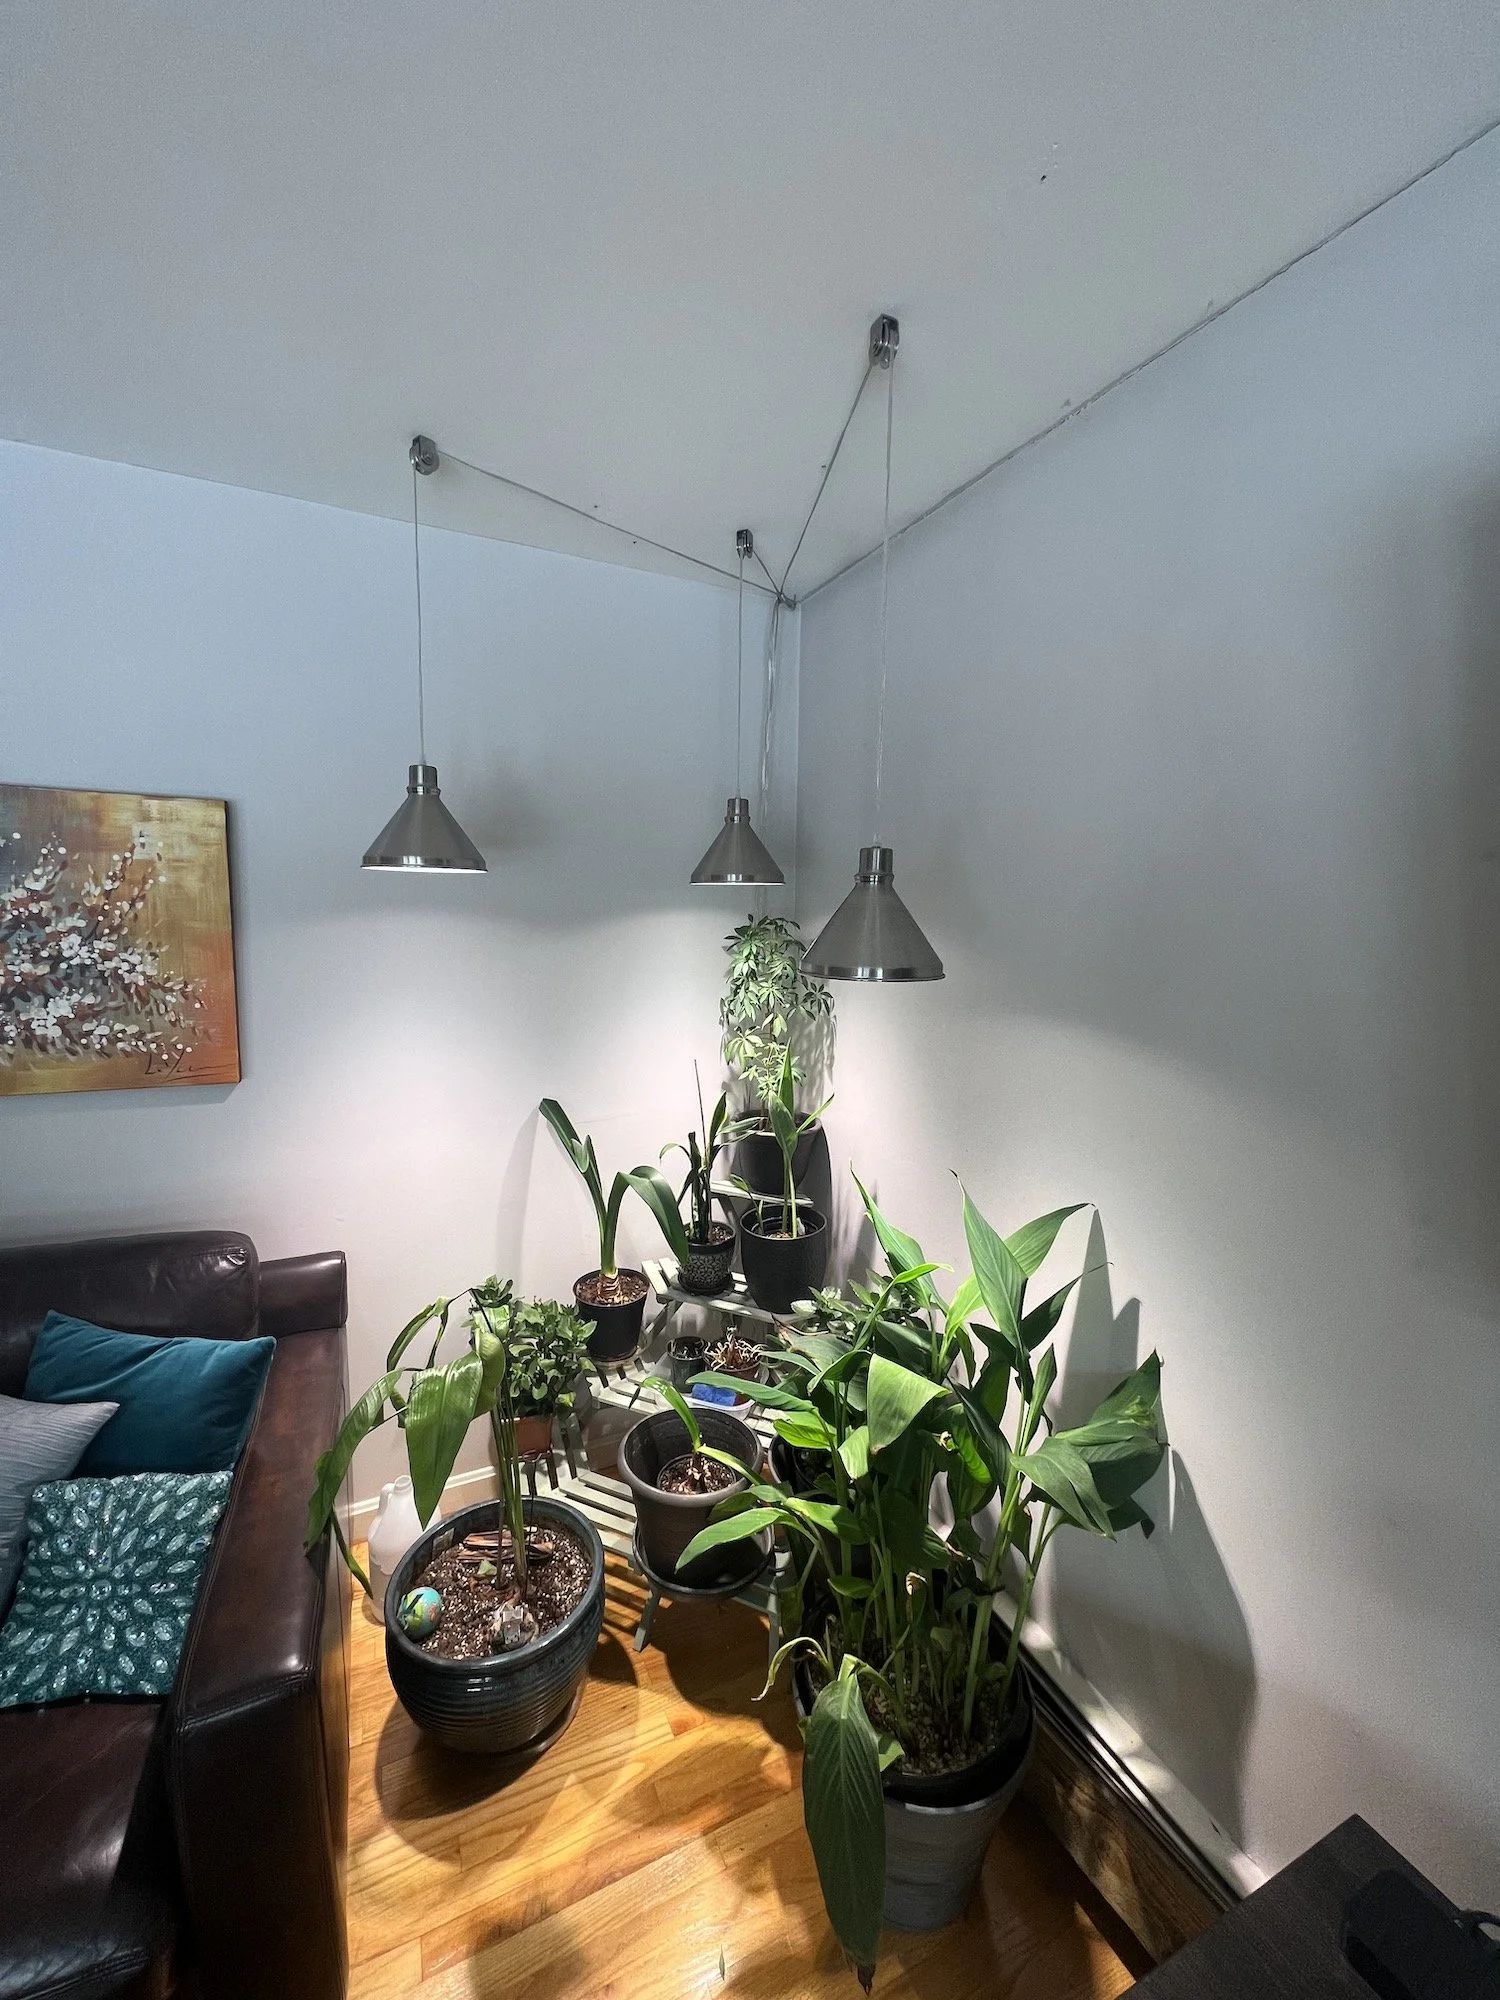
Lights
The lights are a three-part assembly:


I then decided I didn’t like the look of the hooks that came with the cords, so I ordered pulleys instead. I scavenged washers, screws, and drywall anchors from the workshop to finish the install. After much swearing at the teeny clips, I broke down and bought circlip pliers, too.
Swag hooks make it easy to adjust the heights of the lamps.


Plant Stand
This plant stand from Wayfair is small and lightweight, fits perfectly in my living room corner. I might raise it up just a little so the plants are a little more visible. (Good thing my lights are on pulleys.)

2022 Howl-o-ween 5k
We had an extra fun morning watching all the costumed people and dogs parade through town.


New Kitchen Faucet
The faucet had been showing its age. It resisted swinging from left to right, and if I pushed it, the crackling sound of rust dropping below the sink would let me know my efforts were unwelcome. I procrastinated… it worked well enough.
And then the leaking. Dripping at first, then a constant dribble. It was time.
Overall, the job was super easy. A little swearing and discomfort as I bent myself backwards into the lower cabinet and rust fell in my face… but all told I spent more time in the kitchen aisle at Lowe’s picking the thing out.


Pond Flora and Fauna
You probably saw this coming: MORE plants.
The pond’s ecosystem is a new experiment for me. Luckily there’s plenty of information online to make the learning curve a little less steep.

Infographic from https://www.pondexperts.ca/pond-plant-depth-zones/
My Aquatic Collection
As I started browsing catalogs of aquatic plants, I was surprised at how many from my existing garden could thrive with their roots submerged in water. The aquatic plant expert at my local shop says to rinse off the roots… because these plants need nutrients dissolved in water, not actual soil, there’s no sense in dirtying the pond water.
Volunteer Nature
I decided I didn’t want to (yet) deal with fish in my pond, which would add another level of maintenance and complexity. Fish require feeding, correct pH, and winter aeration. Instead, I let my pond be a habitat for the woodland creatures that show up to visit, feed themselves, and do whatever they do in the winter. It has made for some interesting nature watching.


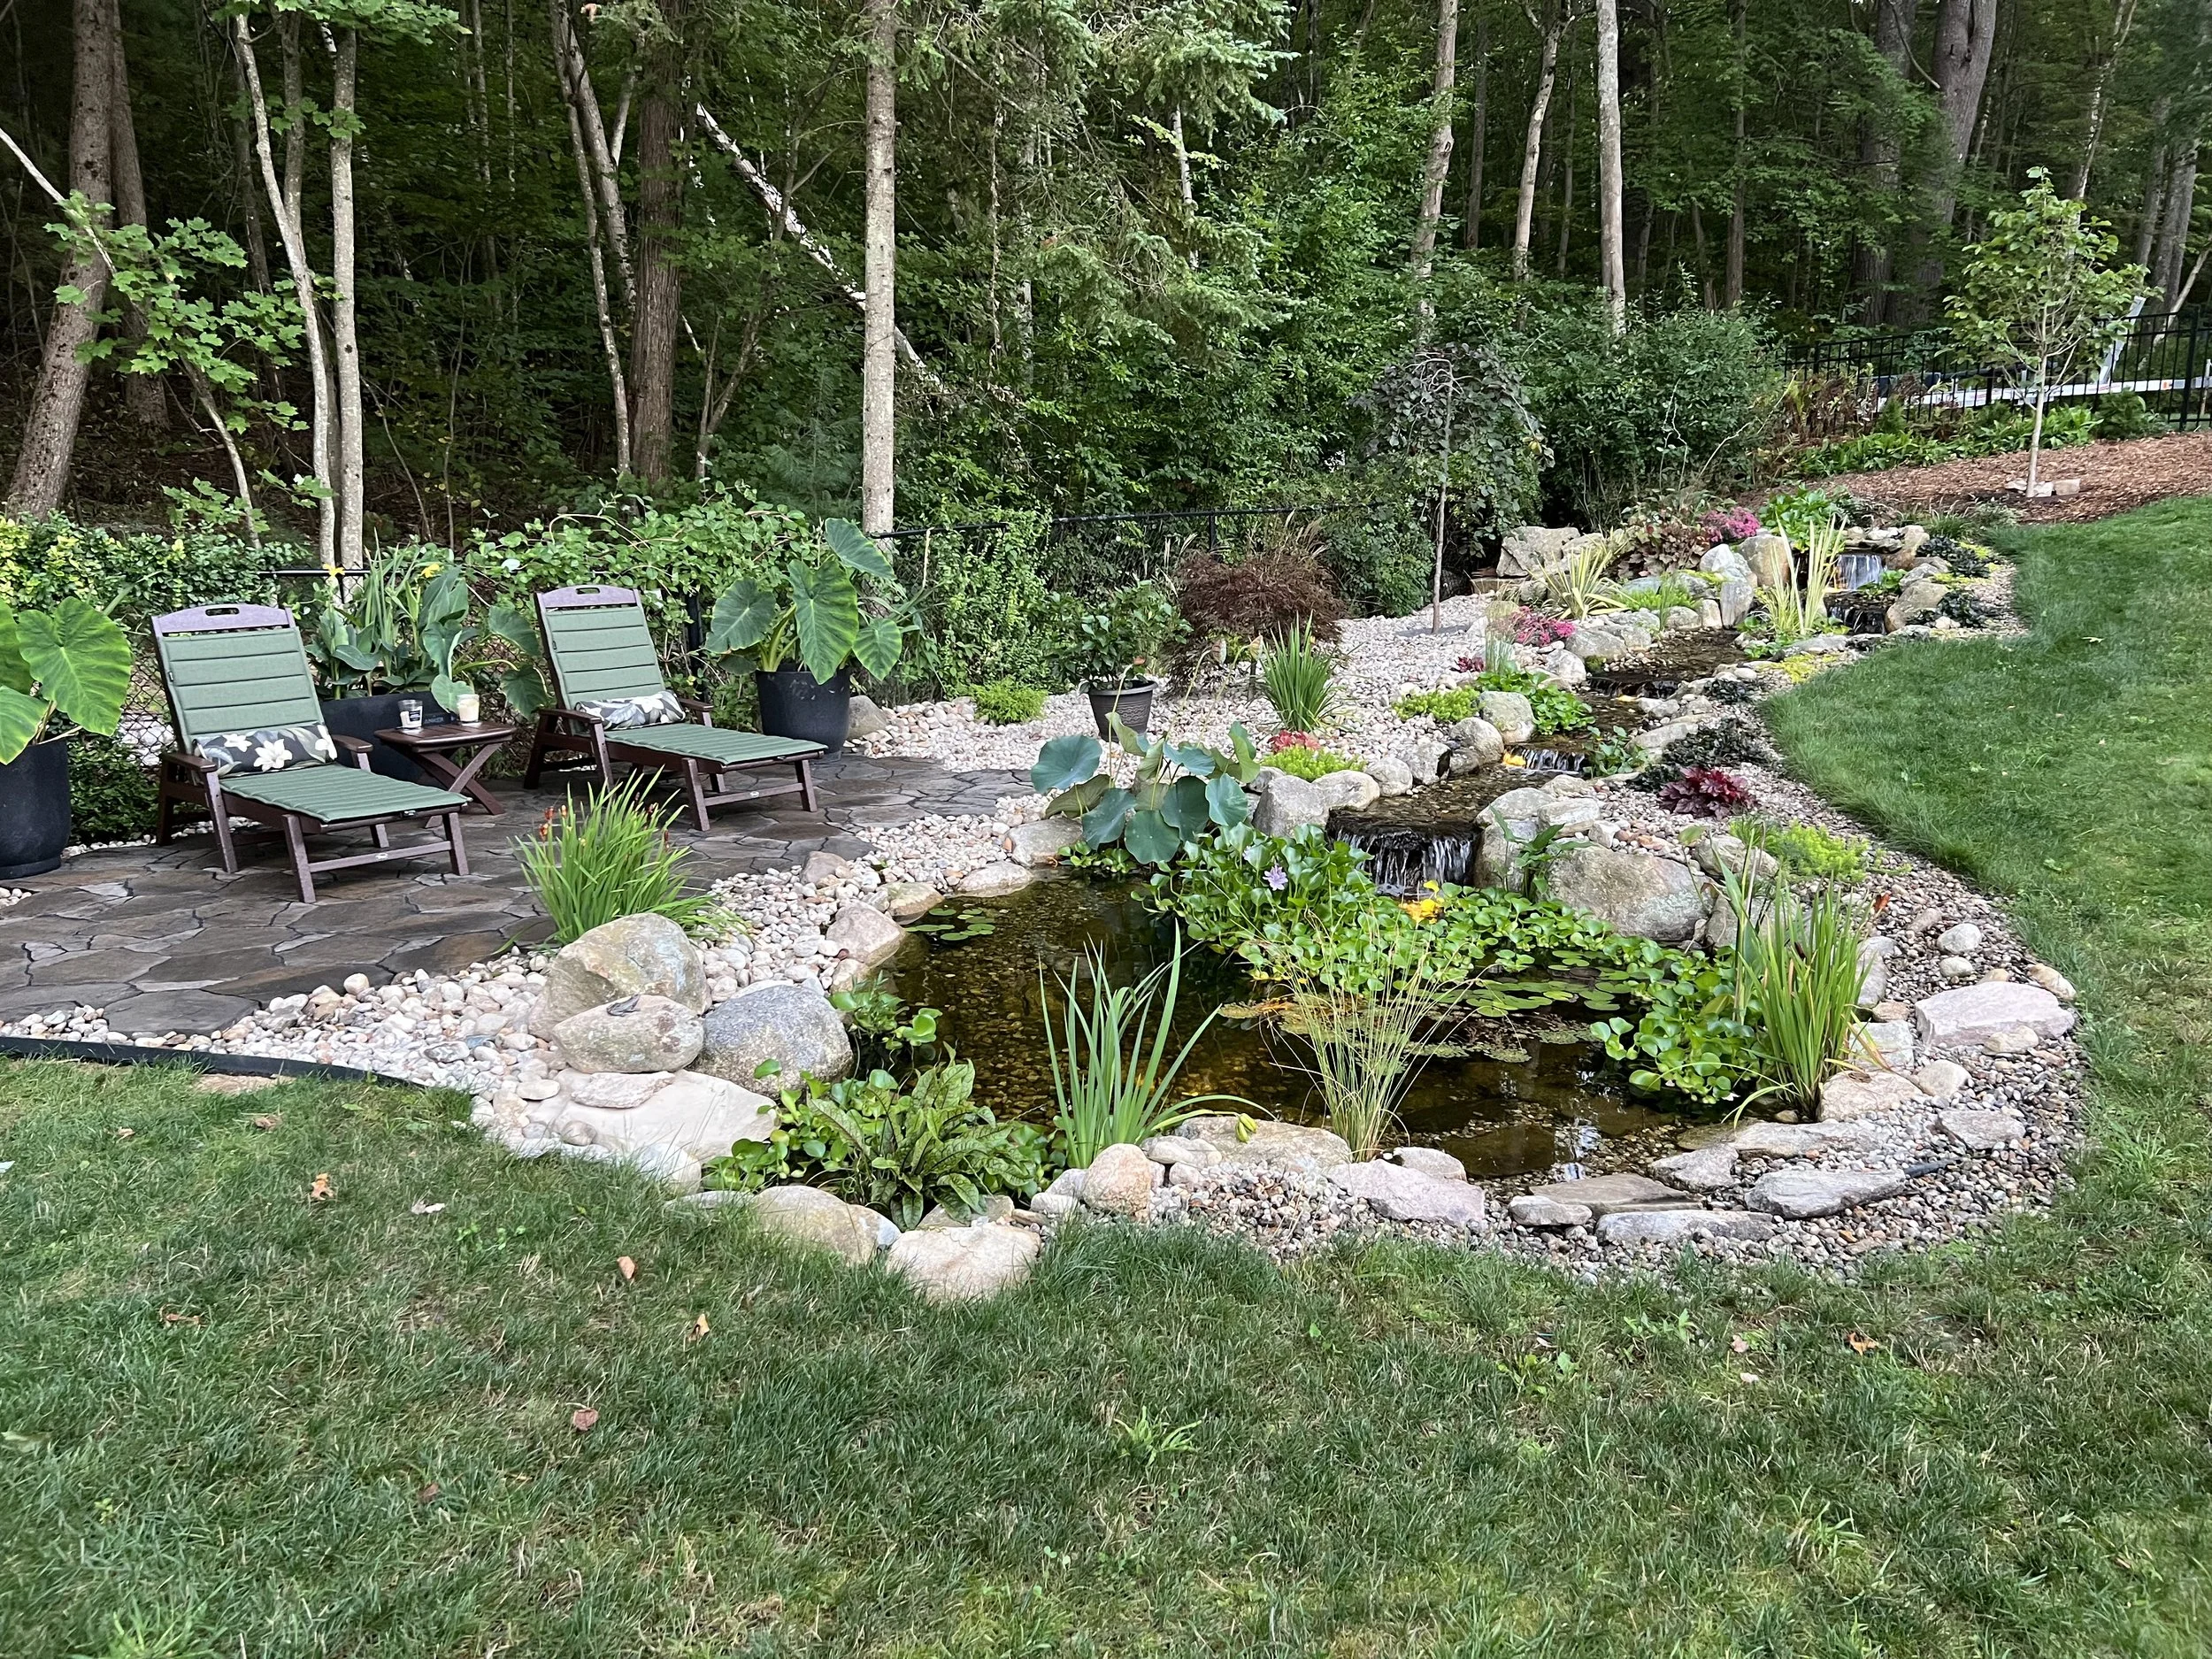

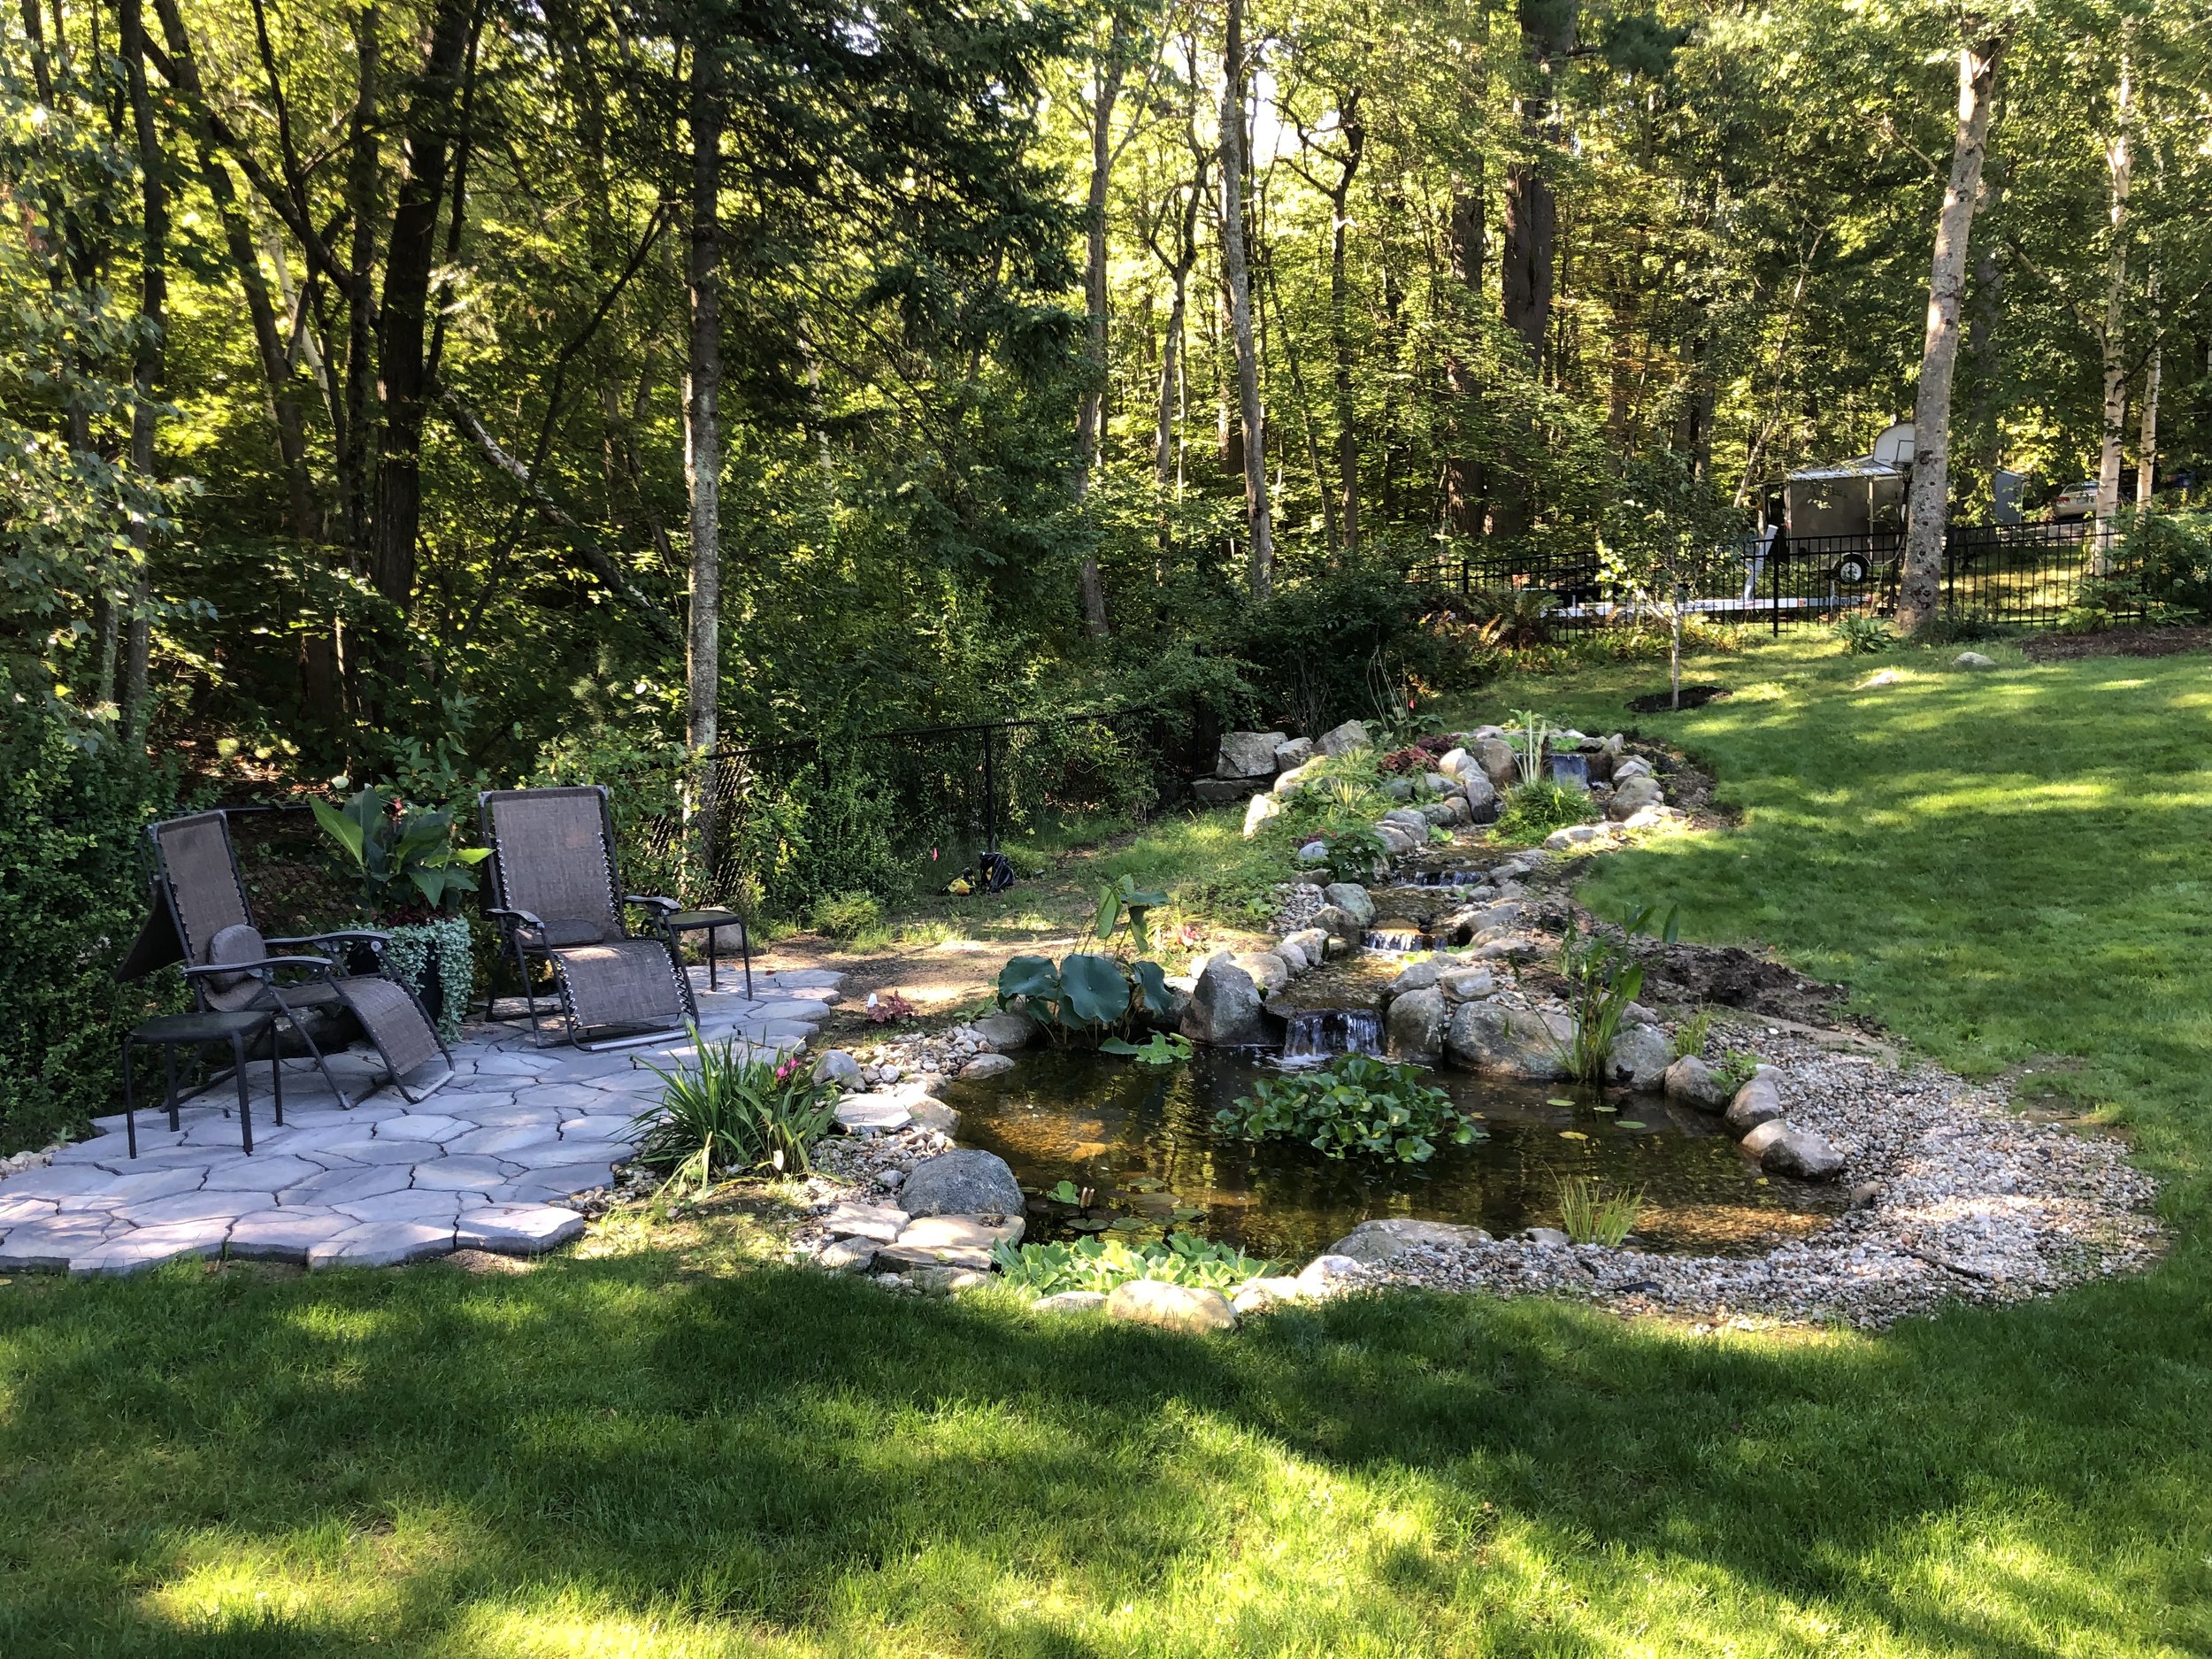
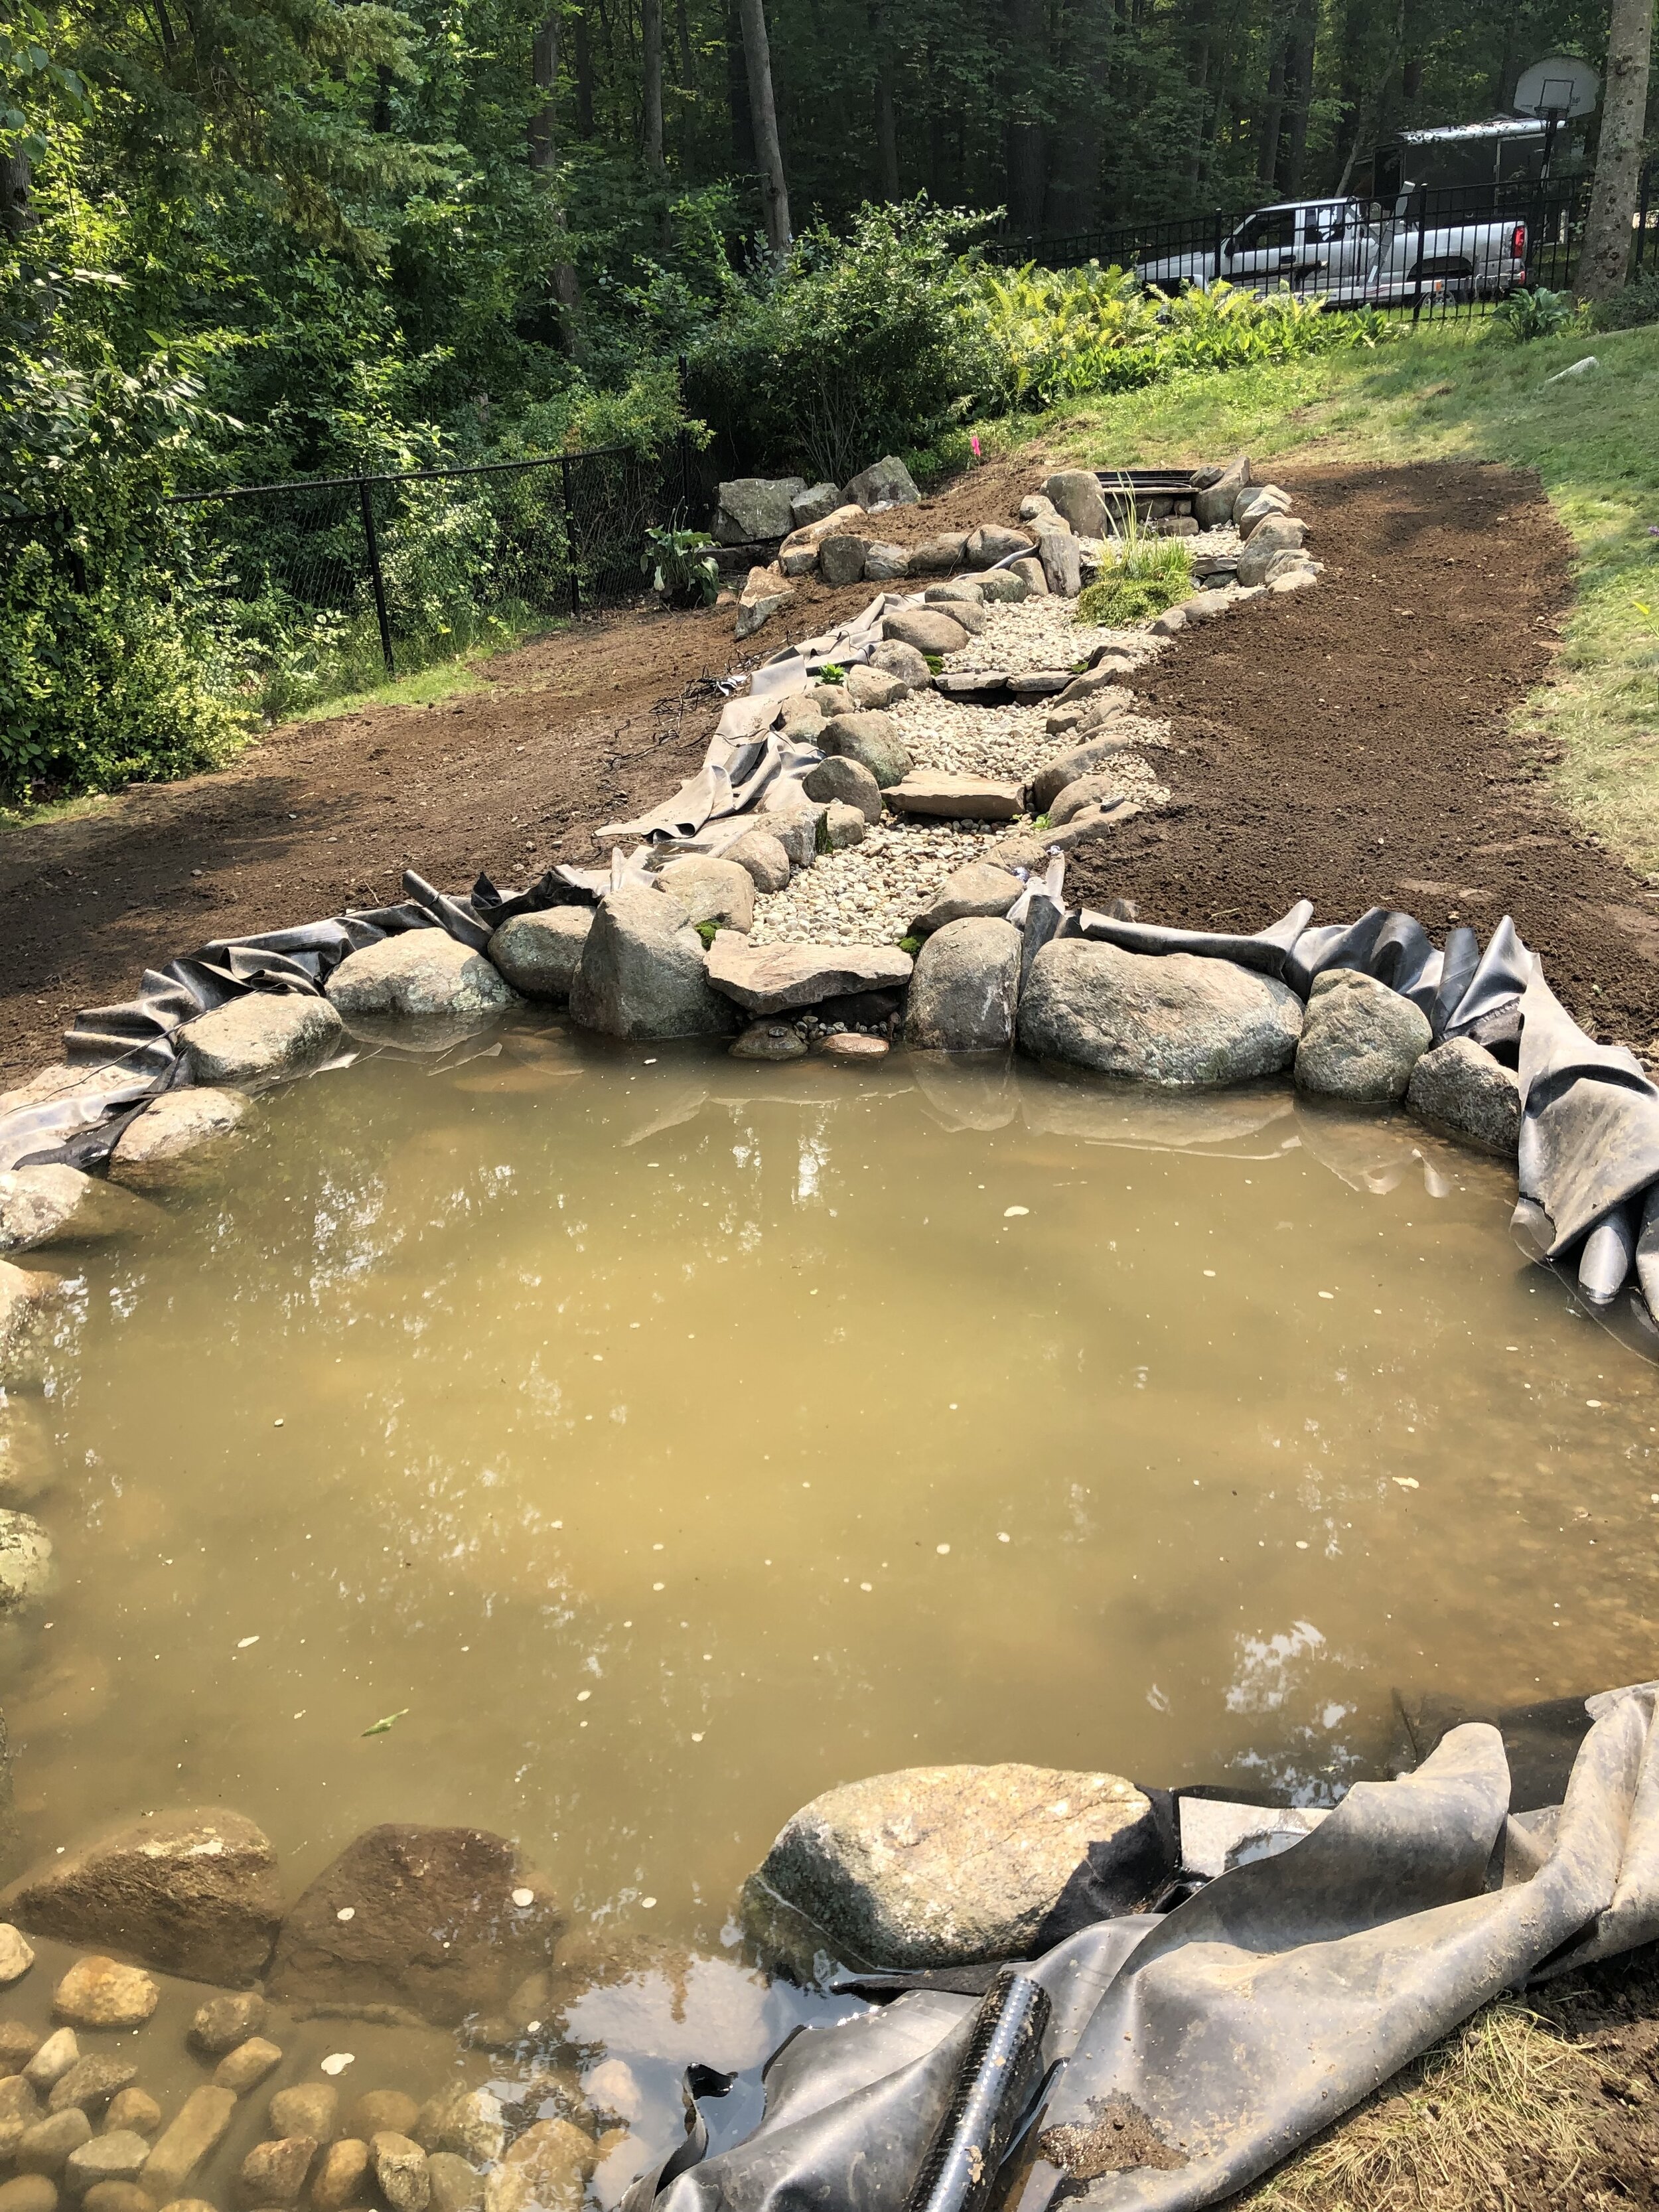
Stream Finishing Part 3: Pond Patio
Once the pond was installed, I realized there would be a wide space between it and the fence… much more space than warranted by a lovely garden backdrop. I decided to create a seating area.
Tossing pavers down on the dirt solved the immediate problem of the mud pit left behind by the construction crew, and prevented the area from becoming overrun by weeds. As the season progressed, I considered it quite a successful proof of concept.

Now for the real deal.
My first patio experiment back in 2016 was decent enough, but I’m already mad about the shifting pavers and endless weeds. I suppose it’s time to learn how to do it the RIGHT way… if it goes well, maybe I’ll re-do the first patio to match. Besides, I like these pavers better than my home-poured ones.
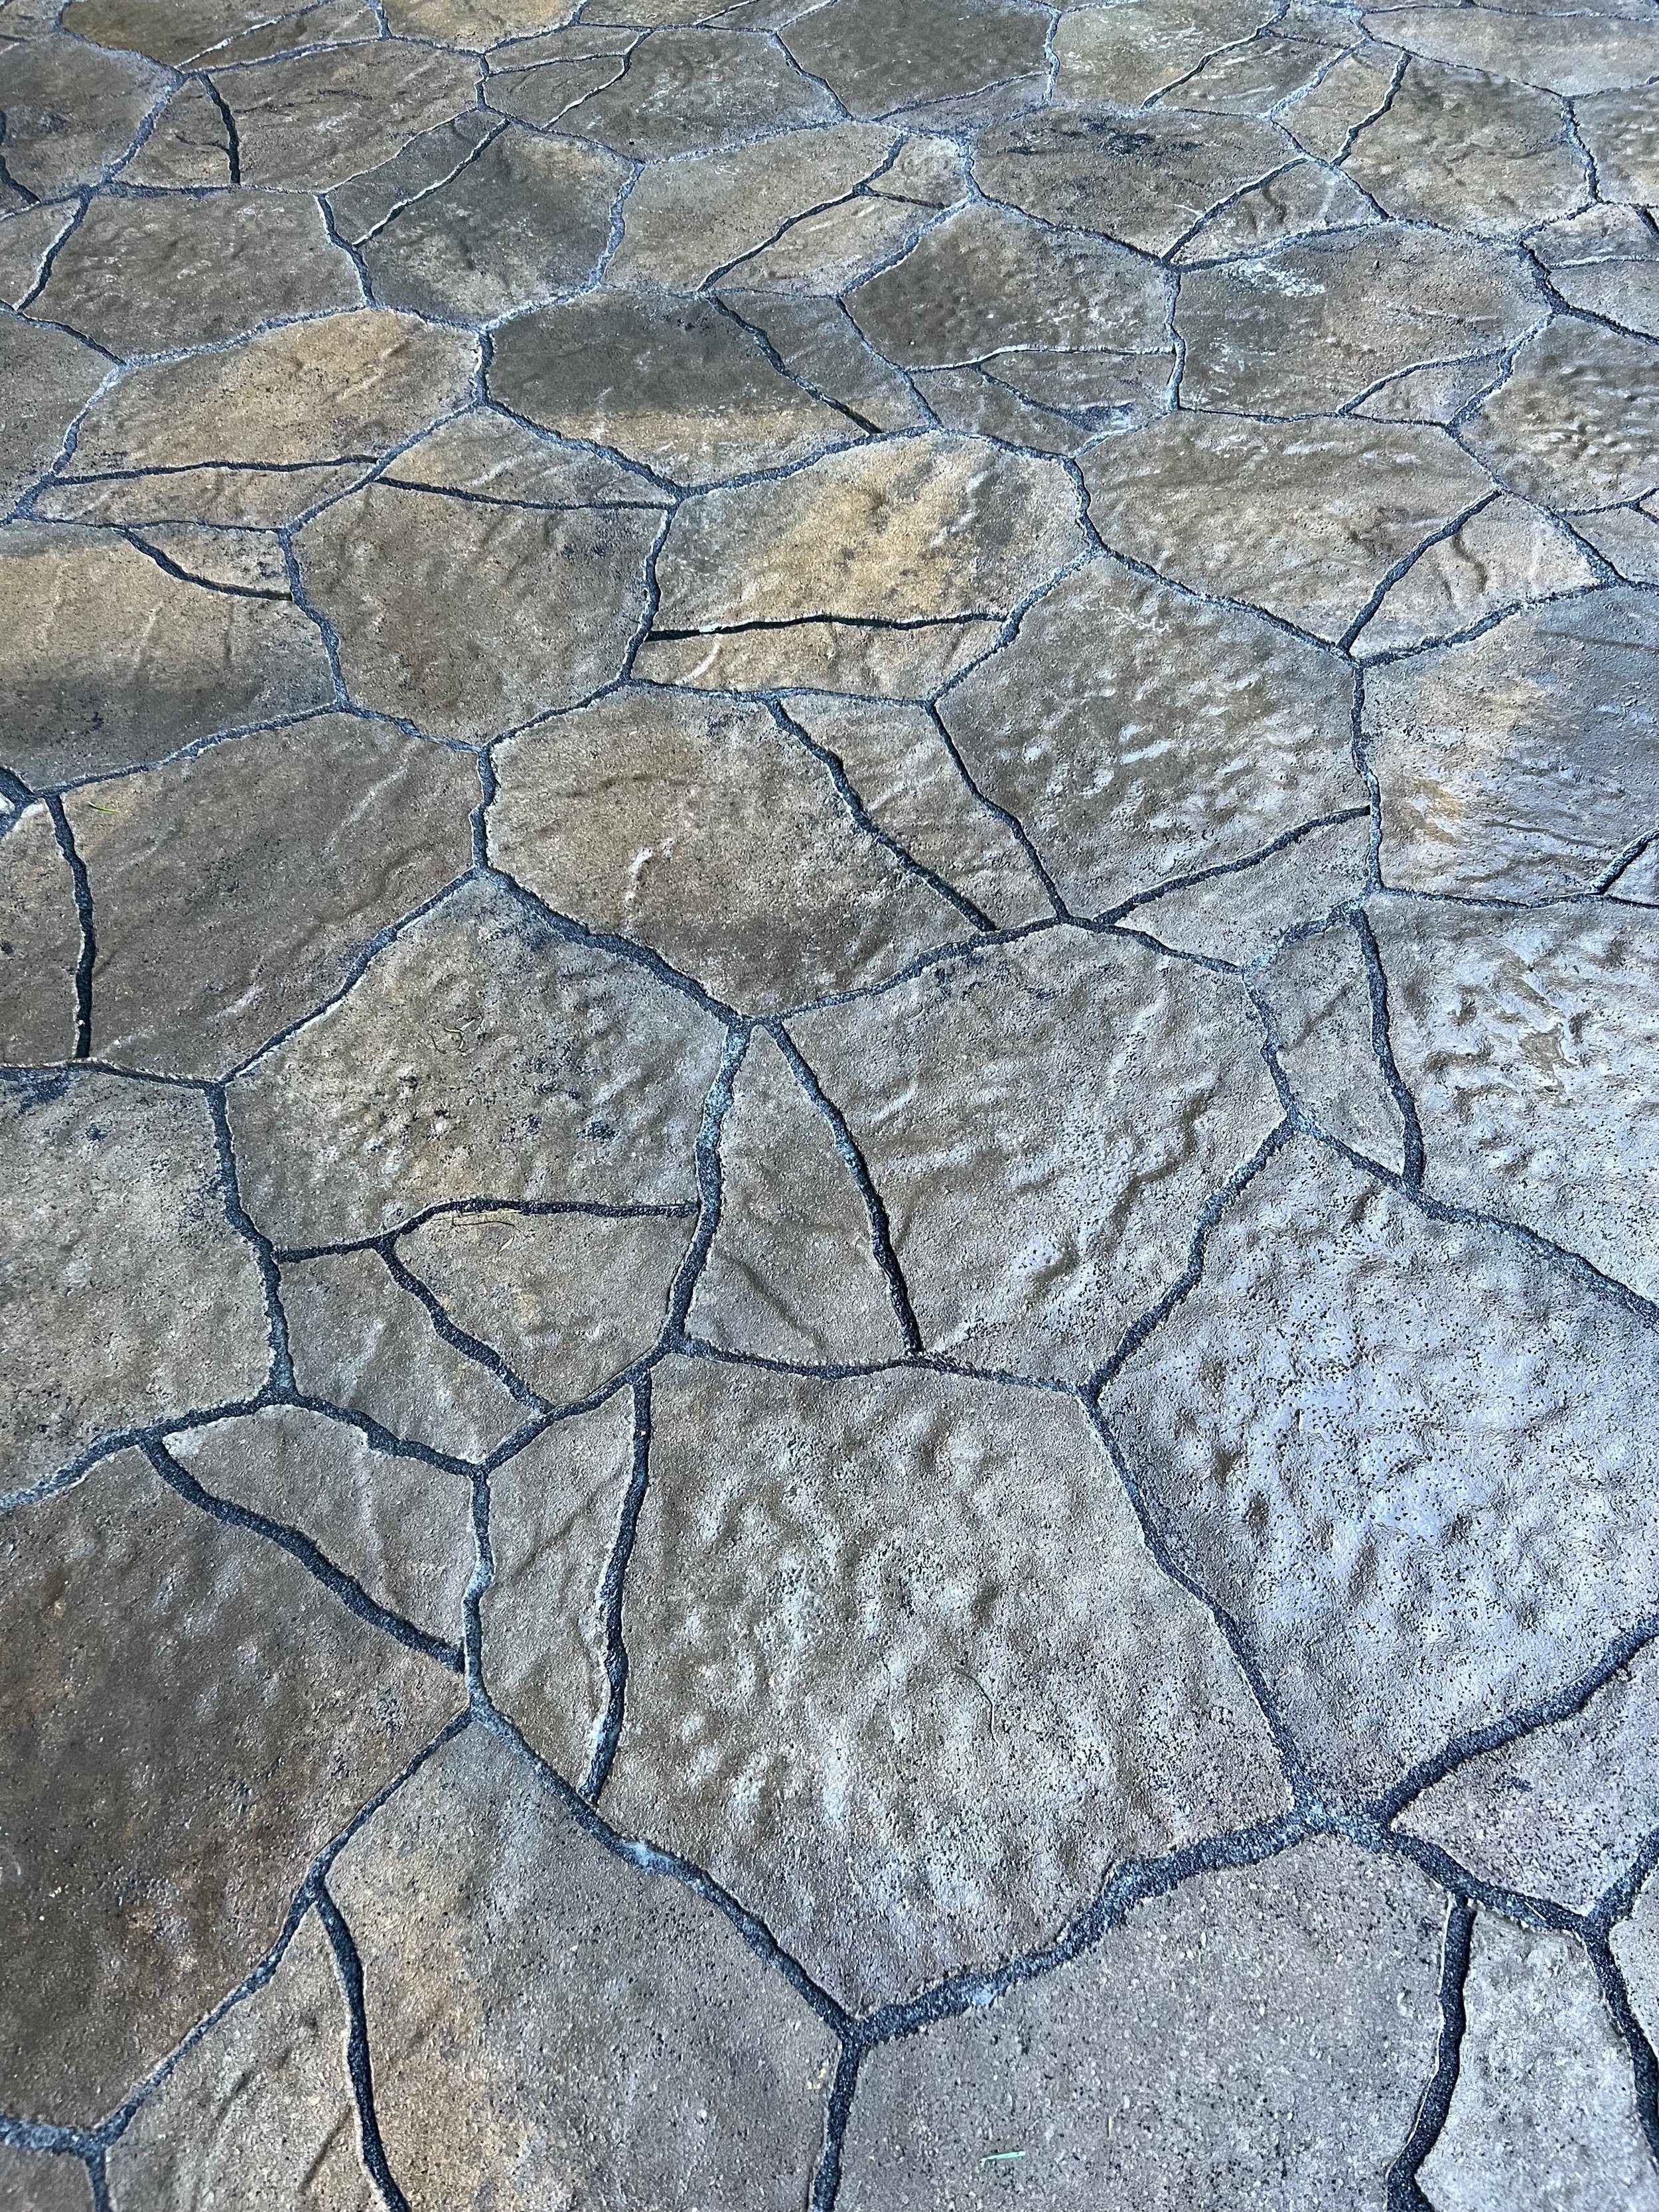
Belgard Portland 21-in L x 15-in W x 2-in H Silex Concrete Patio Stone
The only color in stock at Lowe’s was a grey-ish ‘Silex’, so I also bought some brown concrete stain to brush over the blocks.


The ground is hard-packed from having the excavator drive around on it for a few weeks, so I’m not too worried about renting a compactor. But I will start with landscape fabric, followed by leveling sand and paver base panels. They’re kind of expensive, but I expect to get a more perfect finished product and need less sand.

Pavers placed into the mud needed to be lifted and cleaned off.

With paver base leveled and landscape fabric down, it’s time for smooth sand, underlayment panels, and pavers.

Taking shape

Irregular edge blends into the gravel and stone edge of the pond.
Alliance Gator Maxx G2 Intelligent Polymeric Sand for Paver and Natural Stone Joints UP to 4”(Diamond Black) 50 Ib Bag

Black polymeric sand

Patio, planters, and chaise lounges… Maddox approves!


Taking a well-deserved rest.

Stream Finishing Part 2: Gravel Garden
After Michele helped me clear the giant weed mess (see Stream Finishing Part 1: Mulch Corner), I pinned down landscape fabric to prevent the weeds from sprouting right back up again while I waited for my trees to be installed.

I picked out two beautiful trees to be installed by my local garden center. Like everyone else, they’re crazy busy and booked out. Finally my beauties arrived.

Ruby Falls Redbud: Cercis canadensis 'Ruby Falls'

Japanese Maple: Acer palmatum dissectum 'Red Dragon'

Acer Crimson Queen, Japanese Laceleaf Maple

Cercis Ruby Falls, Weeping Redbud

Trees behind the stream
Now the rocks. Despite the stream being a completely artificial construct, I want to at least try to give it the variation you might find in nature.

1.5” rounded stone

2 cubic yards of the 1.5” and 1 cubic yard of the 2-3”

2-3” rounded stone

First few wheelbarrow loads


Stream Finishing Part 1: Mulch Corner
My concept for the area between the stream and the fence is that it contains year-round interest, and it never needs mowing. This means focusing on plants that keep their structure throughout the winter, as opposed to most of my garden plants which die back to the ground. I decided to install a mulched garden at the top, and a gravel garden below.
I’m also hoping to reduce the amount of weeding it needs… because holy hell look at this mess:

In one of my all-too-frequent moments of garden despair and frustration, Michele came over to help. For those of you who don’t know Michele, she’s my friend & neighbor, and she’s a powerhouse in the garden. She frequently shares her divided plants, and everything in her care seems to flourish. See for yourself:

It started as just a little. And a little more. And a little later I mentioned that my back had started to ache… and Michele said, ‘Yep - mine too!’ and didn't miss a beat slamming the shovel into the weed pile. She’s a machine. We got the entire thing done in one go.
We decided to use plastic tarps to smother the established grass at the top of the stream.
Then the waiting.
Grass at the top of the slope is adequately smothered, and I’m tired of looking at the ugly tarps. This is where the elbow grease takes over.

The silver tarp smothered the grass during our 90+ degree heat wave and drought.

The area looks bigger from above.

Pulling clumps of dead grass, spreading landscape fabric, and covering with mulch.

Plantings at the top of the stream are coming along nicely.


Auto Mower
I’m glad to let robots do the yard work for me.
I’ve run out of neighbor kids who are interested in a summer mowing gig, so I’m going robotic. The benefits are:
Electric. No more worrying about stale gas and oil changes.
Silent. This thing can run in the middle of the night and not bother anyone.
Automatic. I no longer have to think about when my lawn gets mowed.
Damp-safe. The mower will run in dew and light rain, returning to the base station if it senses a downpour. But the ability to deal with a little moisture means I no longer need to time my mowings around the weather and irrigation schedule.
Irregular. By mowing in seemingly random patterns, you stimulate richer and fuller grass growth.
Less thatch, more nutrients. Because the mower razor-slices off only a few millimeters at a time, the confetti created falls down to the soil level and decomposes faster than a longer chopped piece of grass. No bagging, raking, or blowing the cuttings is required.
Constant height. Best of all, the grass is always the perfect height. It can be kept a little shorter than the typical 3” New England standard… that’s only required if your grass grows out to 6” or so between weekly cuttings, which mine does. Lawns grow to be extra plush and thick when the blades aren’t chopped in half once a week.
My New Robot
I got a Husqvarna 450X - nicknamed ‘Husqi’ - used from friends who upgraded. Because we saw it in use on the block, I got to see how Maddox will react. She’s curious, but not too bothered. I think she just wanted to sniff its butt.


Boundary Wire Installation
The area to mow (outlined in pink) is a far cry from the boring perfect rectangle, which is why I love it… but it means a lot of boundary wire. The perimeter is about 1200 feet, and the area is about 8200 square feet.
Buying used saved me a good deal of money, but cost me a few days of backaches getting the wire installed myself. I could hire someone to run the line using a grass-slicing machine, but tacking it to the surface is an appealing way to get the placement right… and easily adjust if it’s not. I’ll need to be mindful when it comes time to de-thatch or aerate, but in a few months the wire will be completely hidden.
A guide wire (one of three, potentially) helps the mower find its way back to the charging station.

Lawn area shown in pink
Required tools: hand shovel, hammer or mallet, and pliers.
Guide wire (mine happens to be green) spliced into the black boundary wire.
Wire gets hidden quickly by grass. Within a month or so, I have to really search if I want to find the wire.
Getting started in the tall grass
The front lawn doesn’t have the criss-cross ball field striped look, but I’m just fine with that.
GPS tracking leaves something to be desired, but gives the general gist of coverage.
Maddox gets nudged every now and then, but has learned to stay out of Husqi’s way.
Notifications to my phone tell me when Husqi is out of bounds. After a few drops off this corner, it was time to move the boundary wire another inch farther from the sloped curb.
Looks good with zero effort. If only they made robots for the rest of life’s chores.

Crop circles handle the areas of tall grass.
Here’s a quick (well, 27 sec, sped up 8x from the original) video of Husqi following the guide wire from the far front corner, over the narrow driveway crossing, across the wide front yard, through the gate in the fence, and lining up to the docking station. For all the complications I created for it, Husqi has never failed to find its way home.
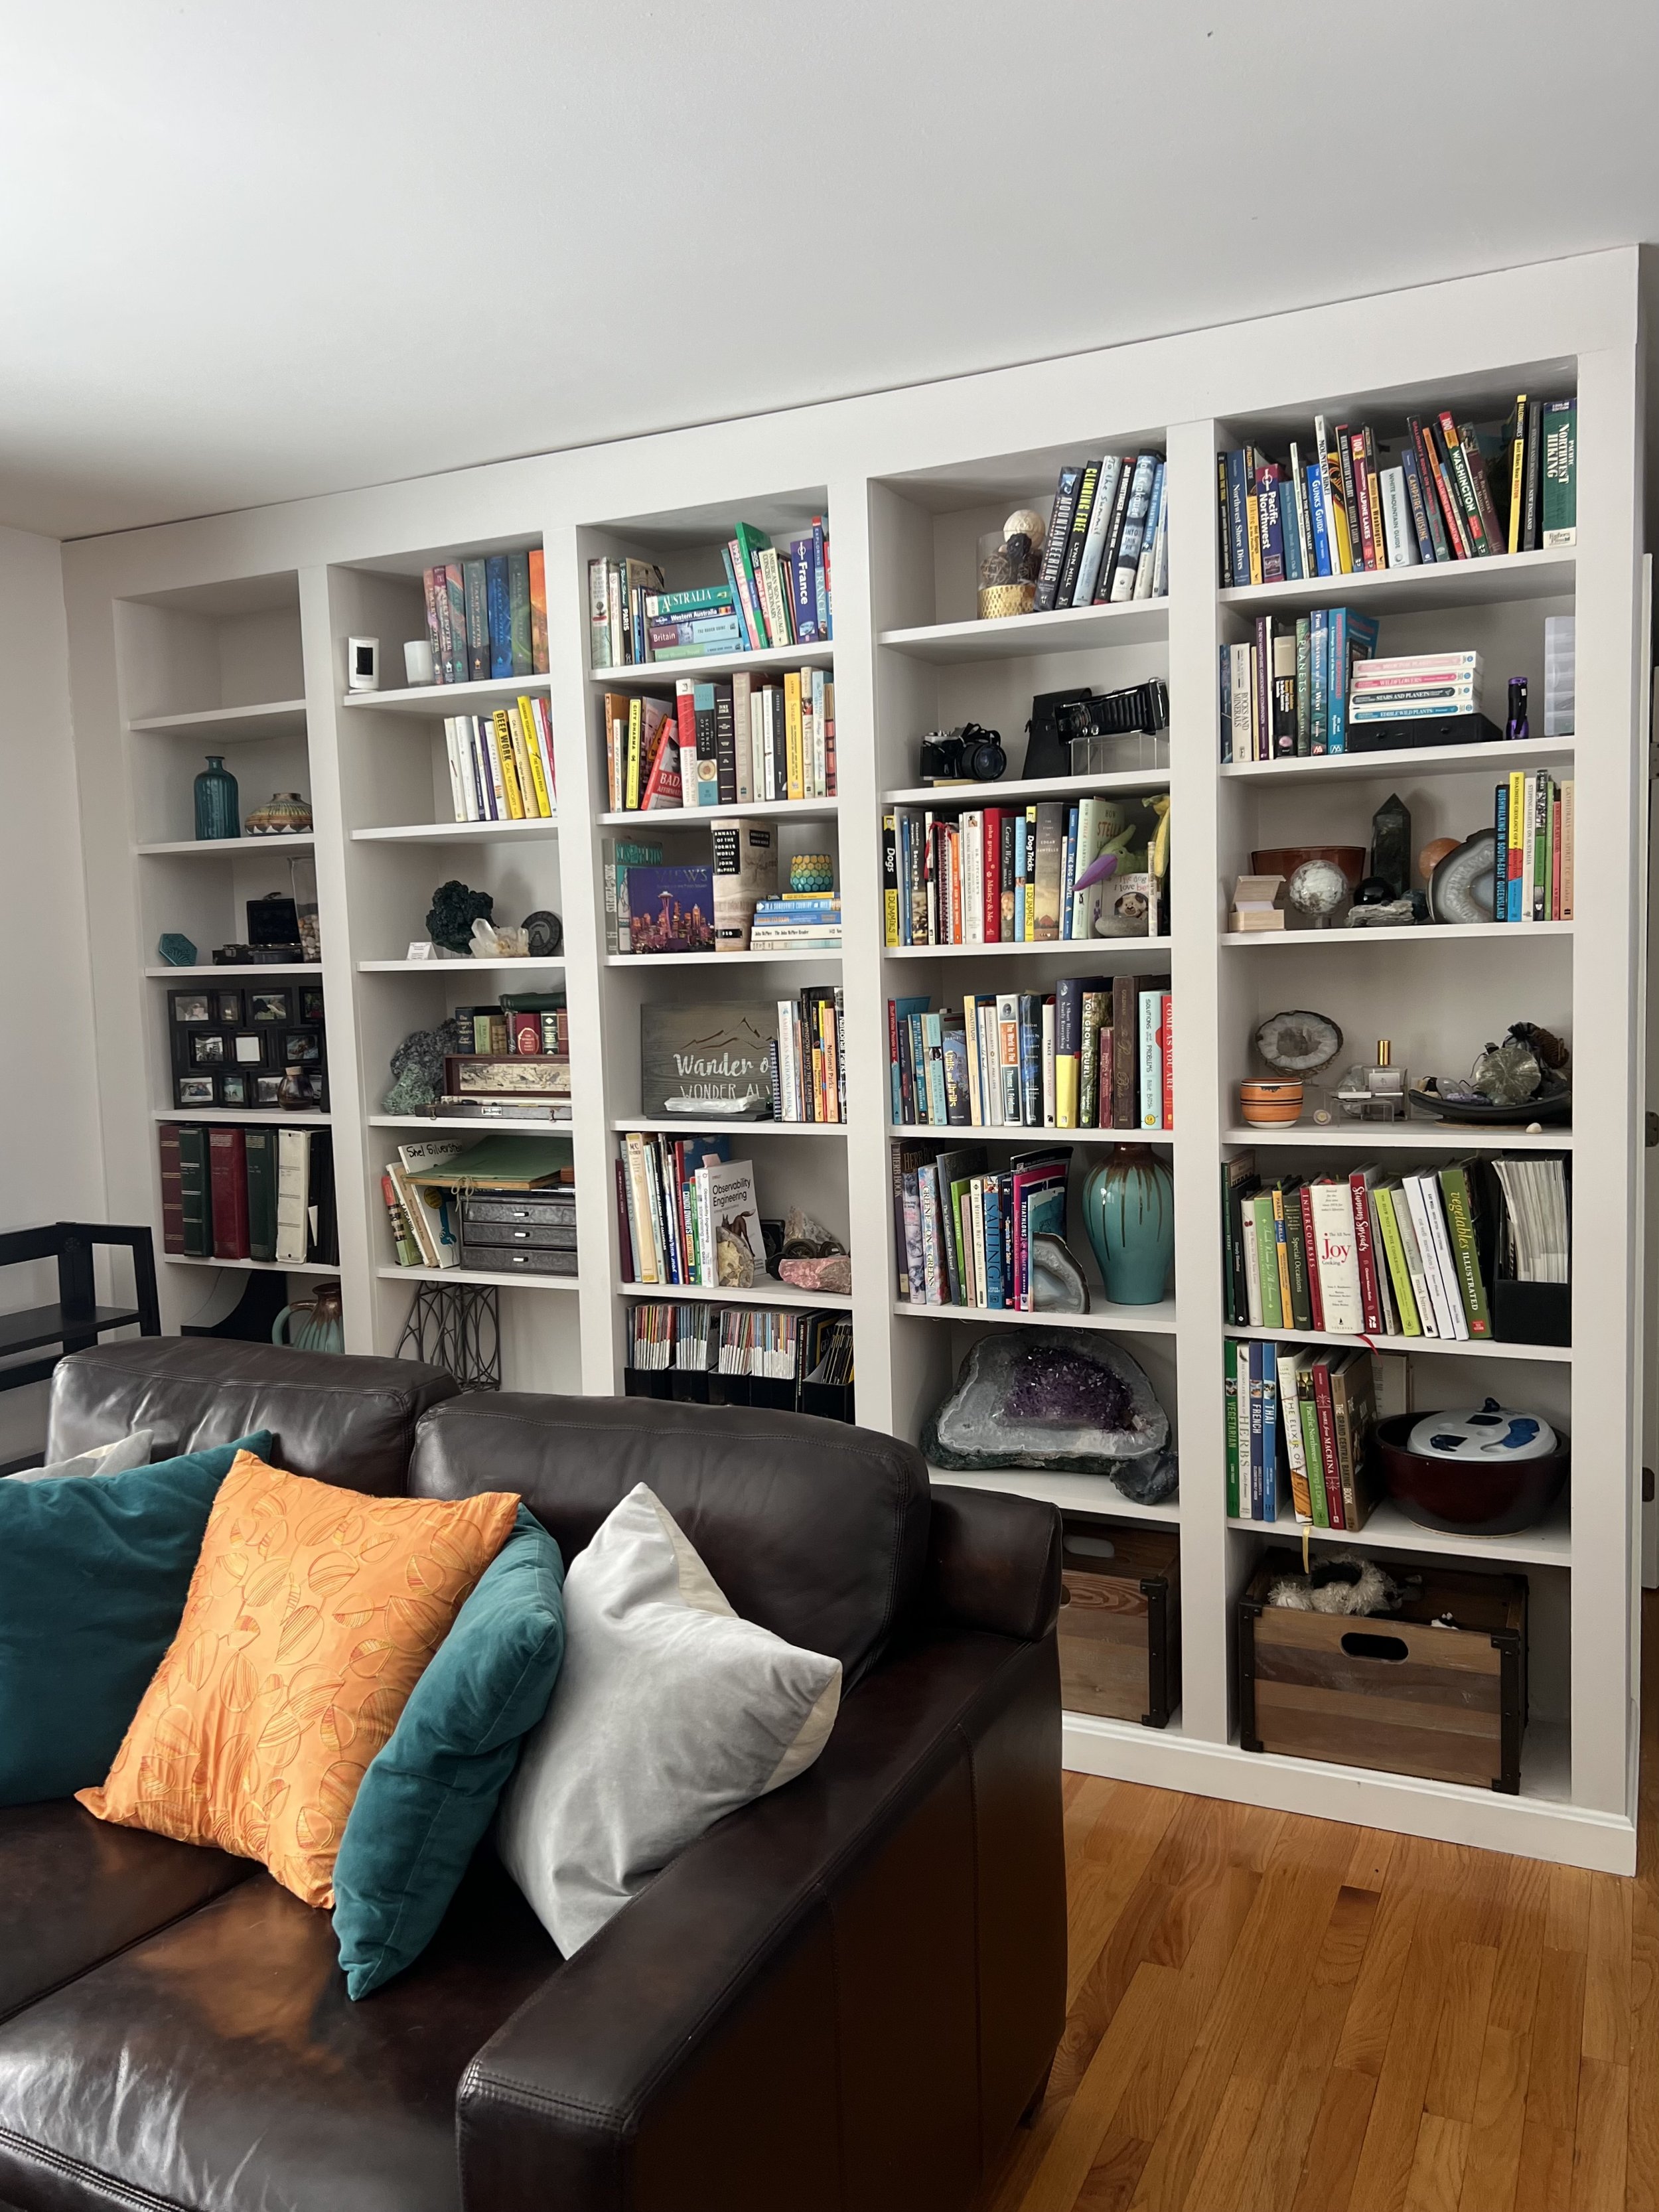
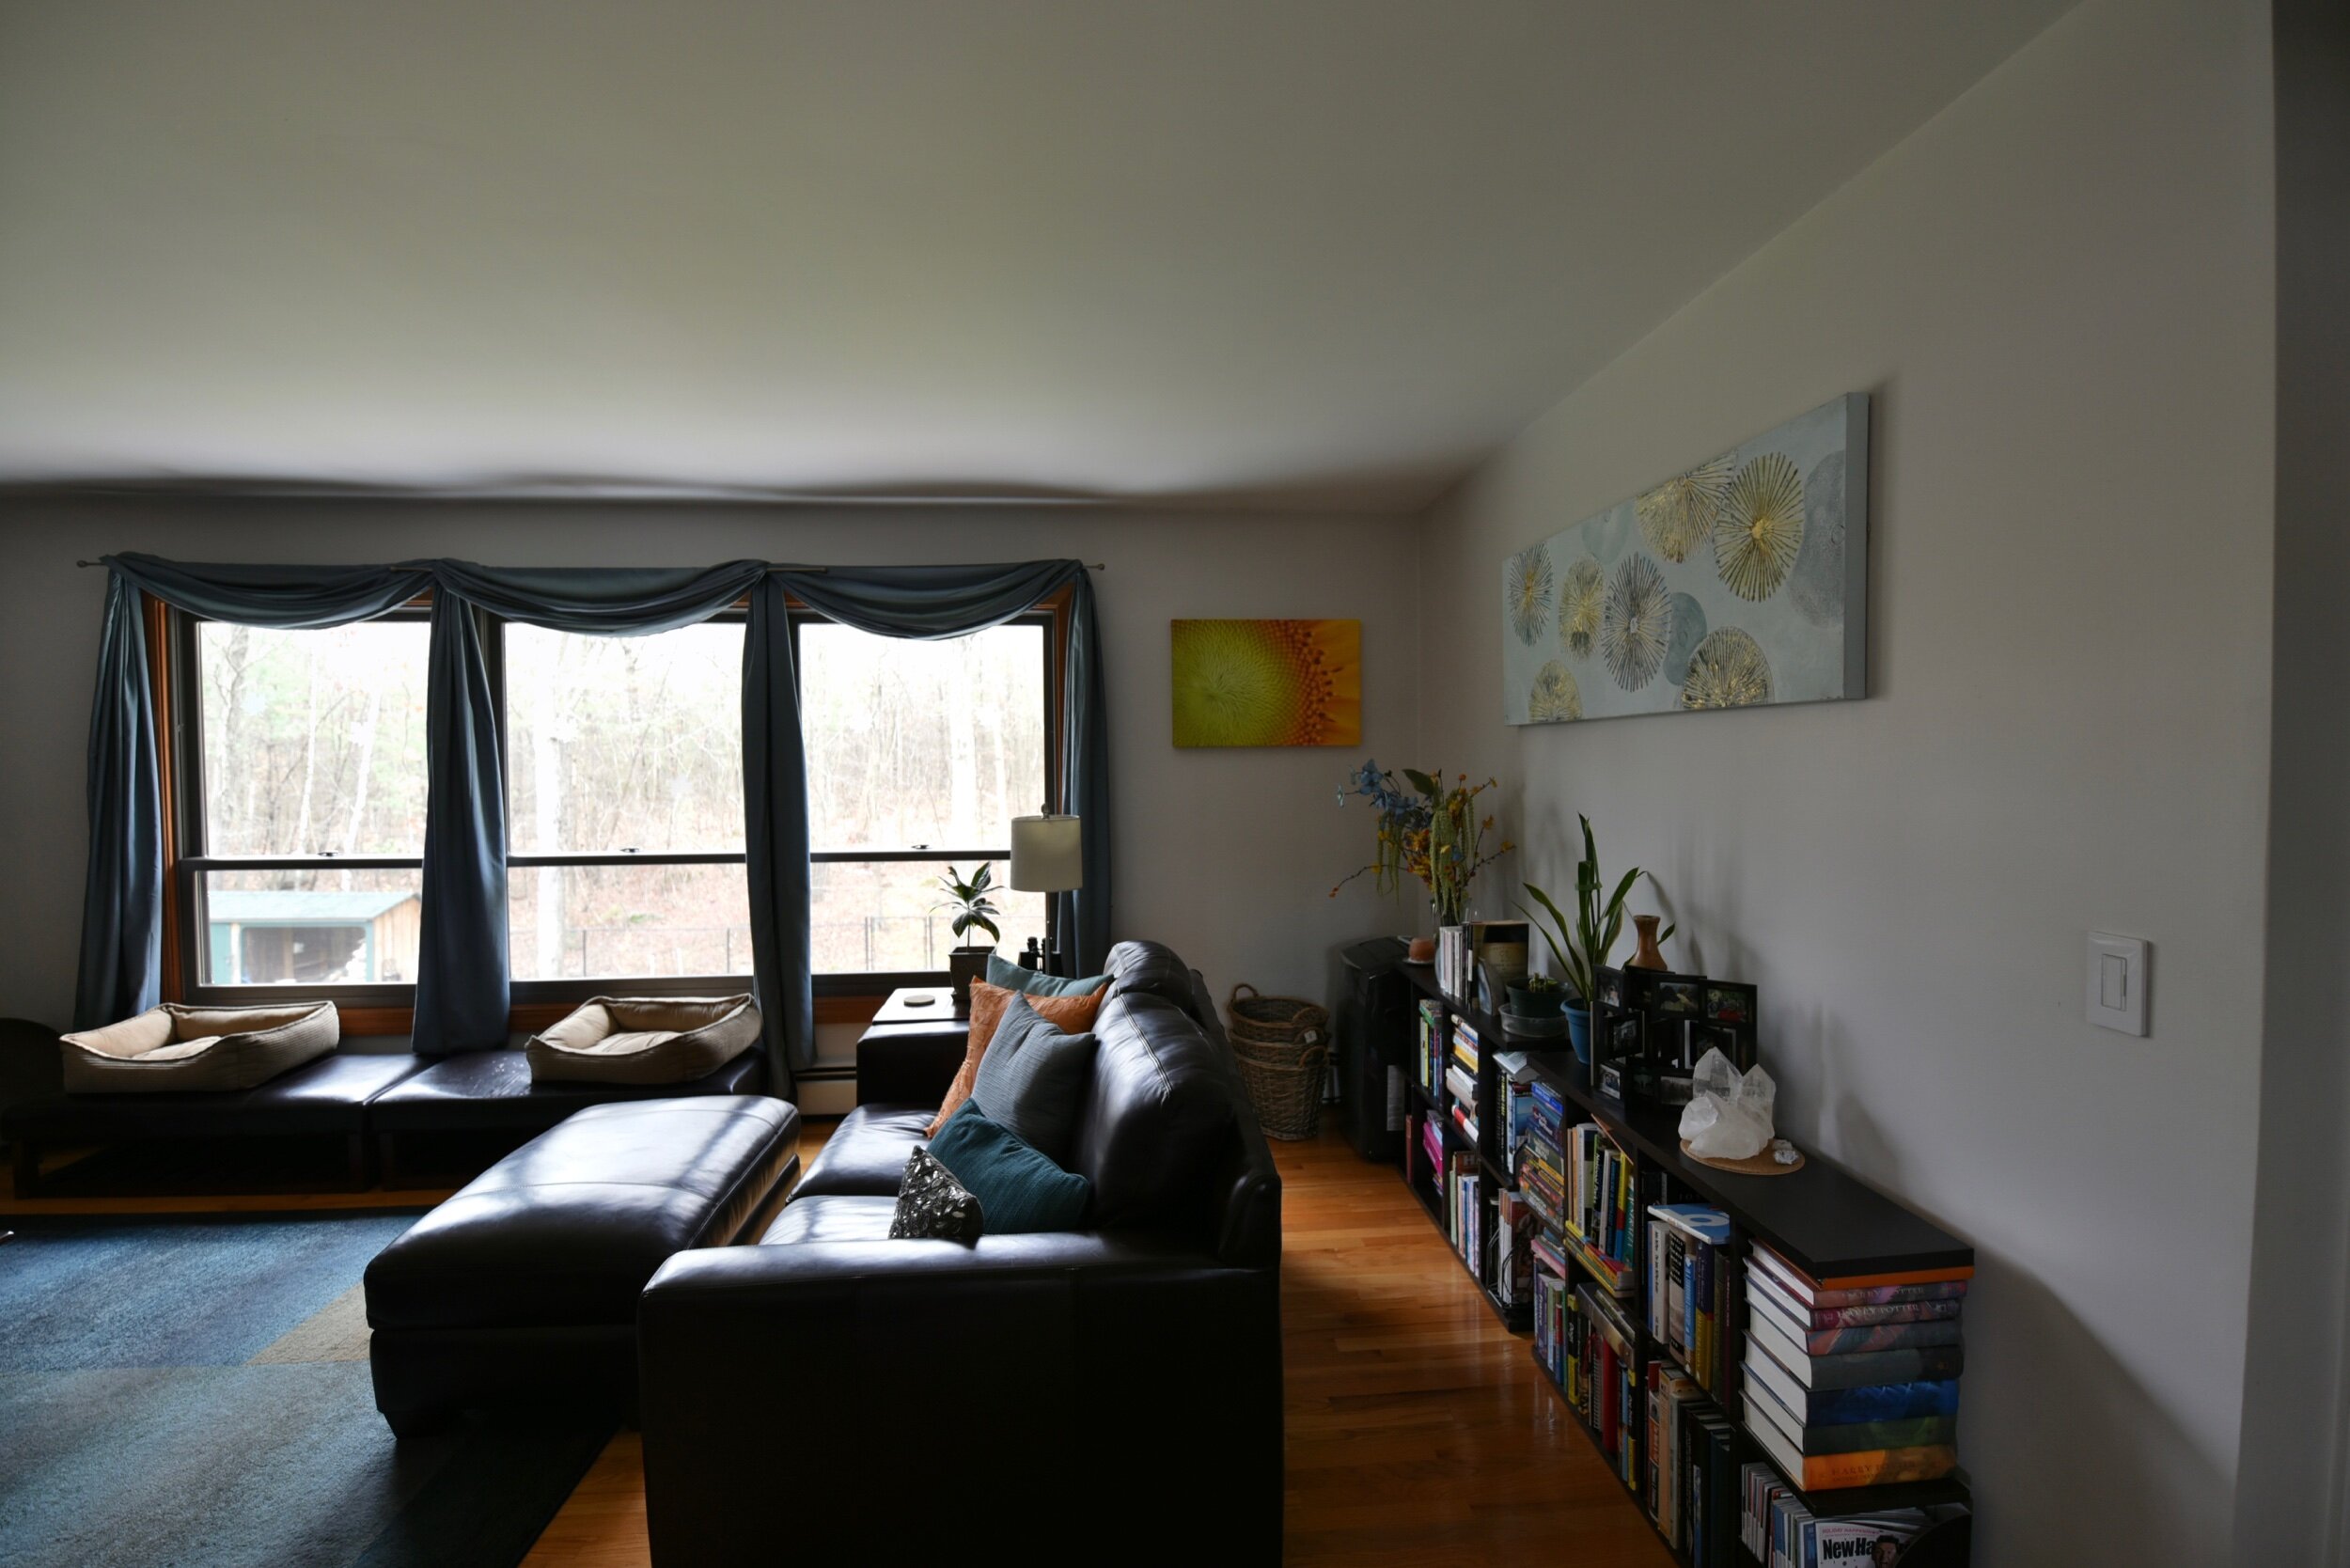
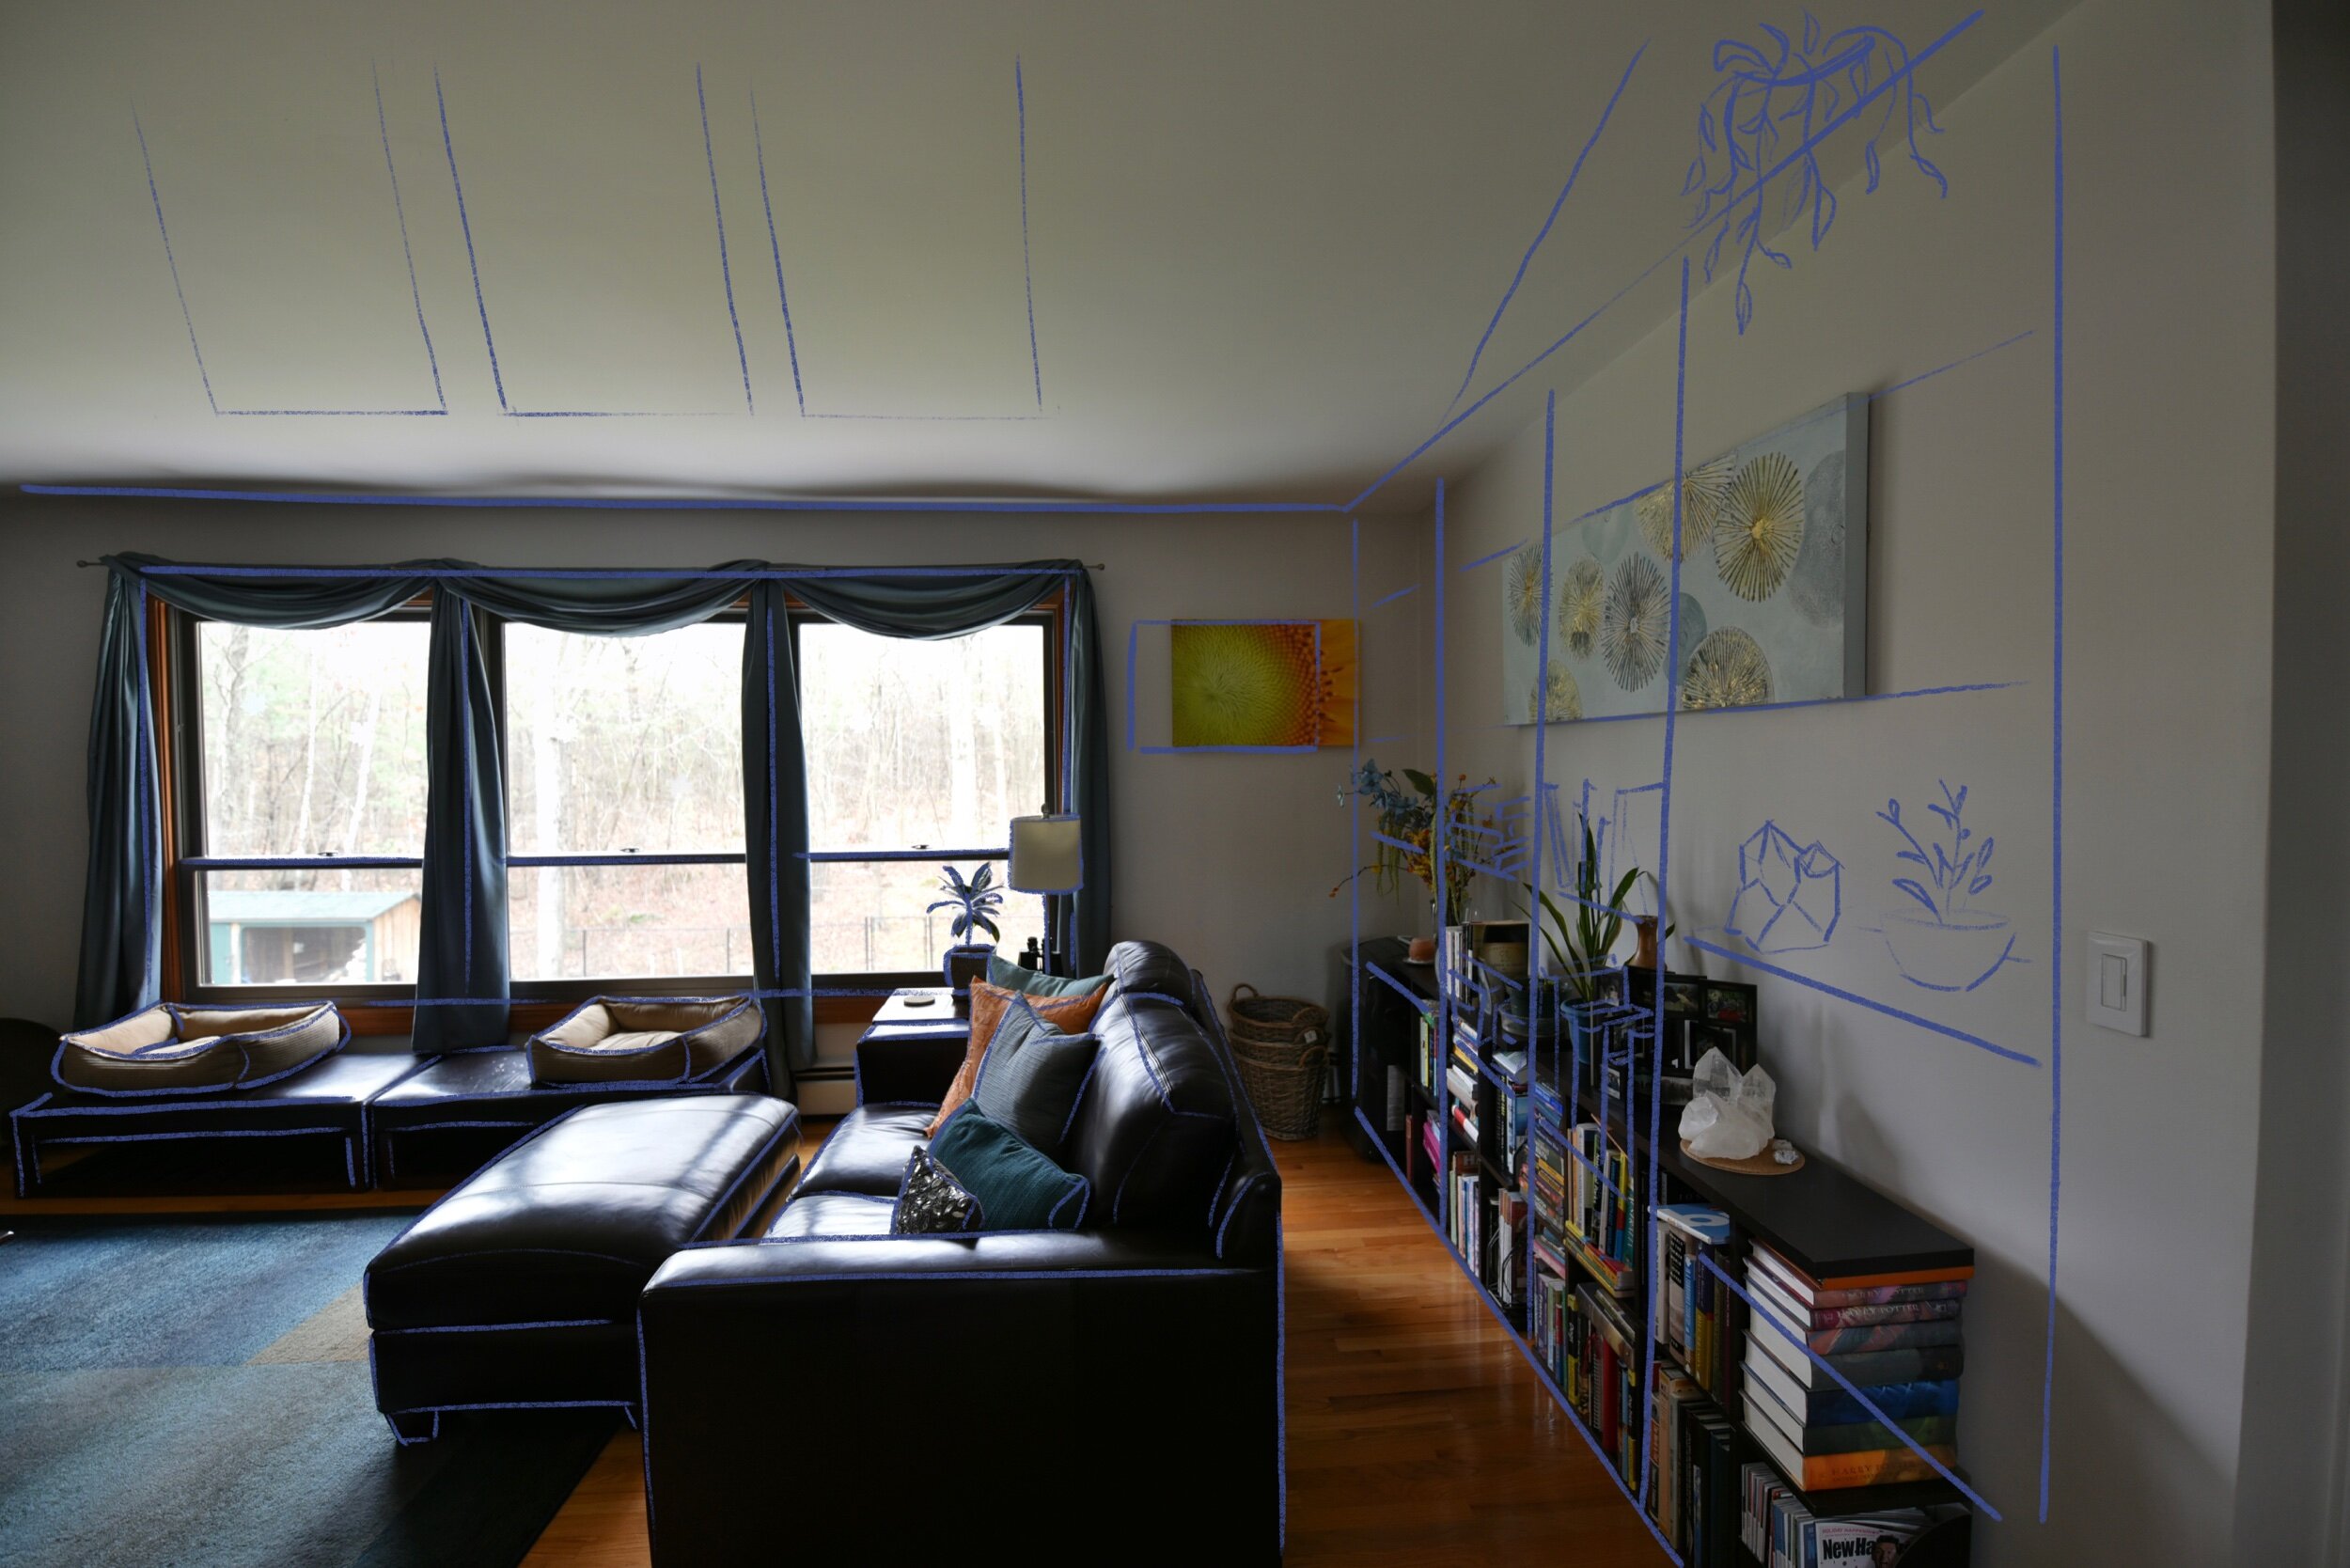
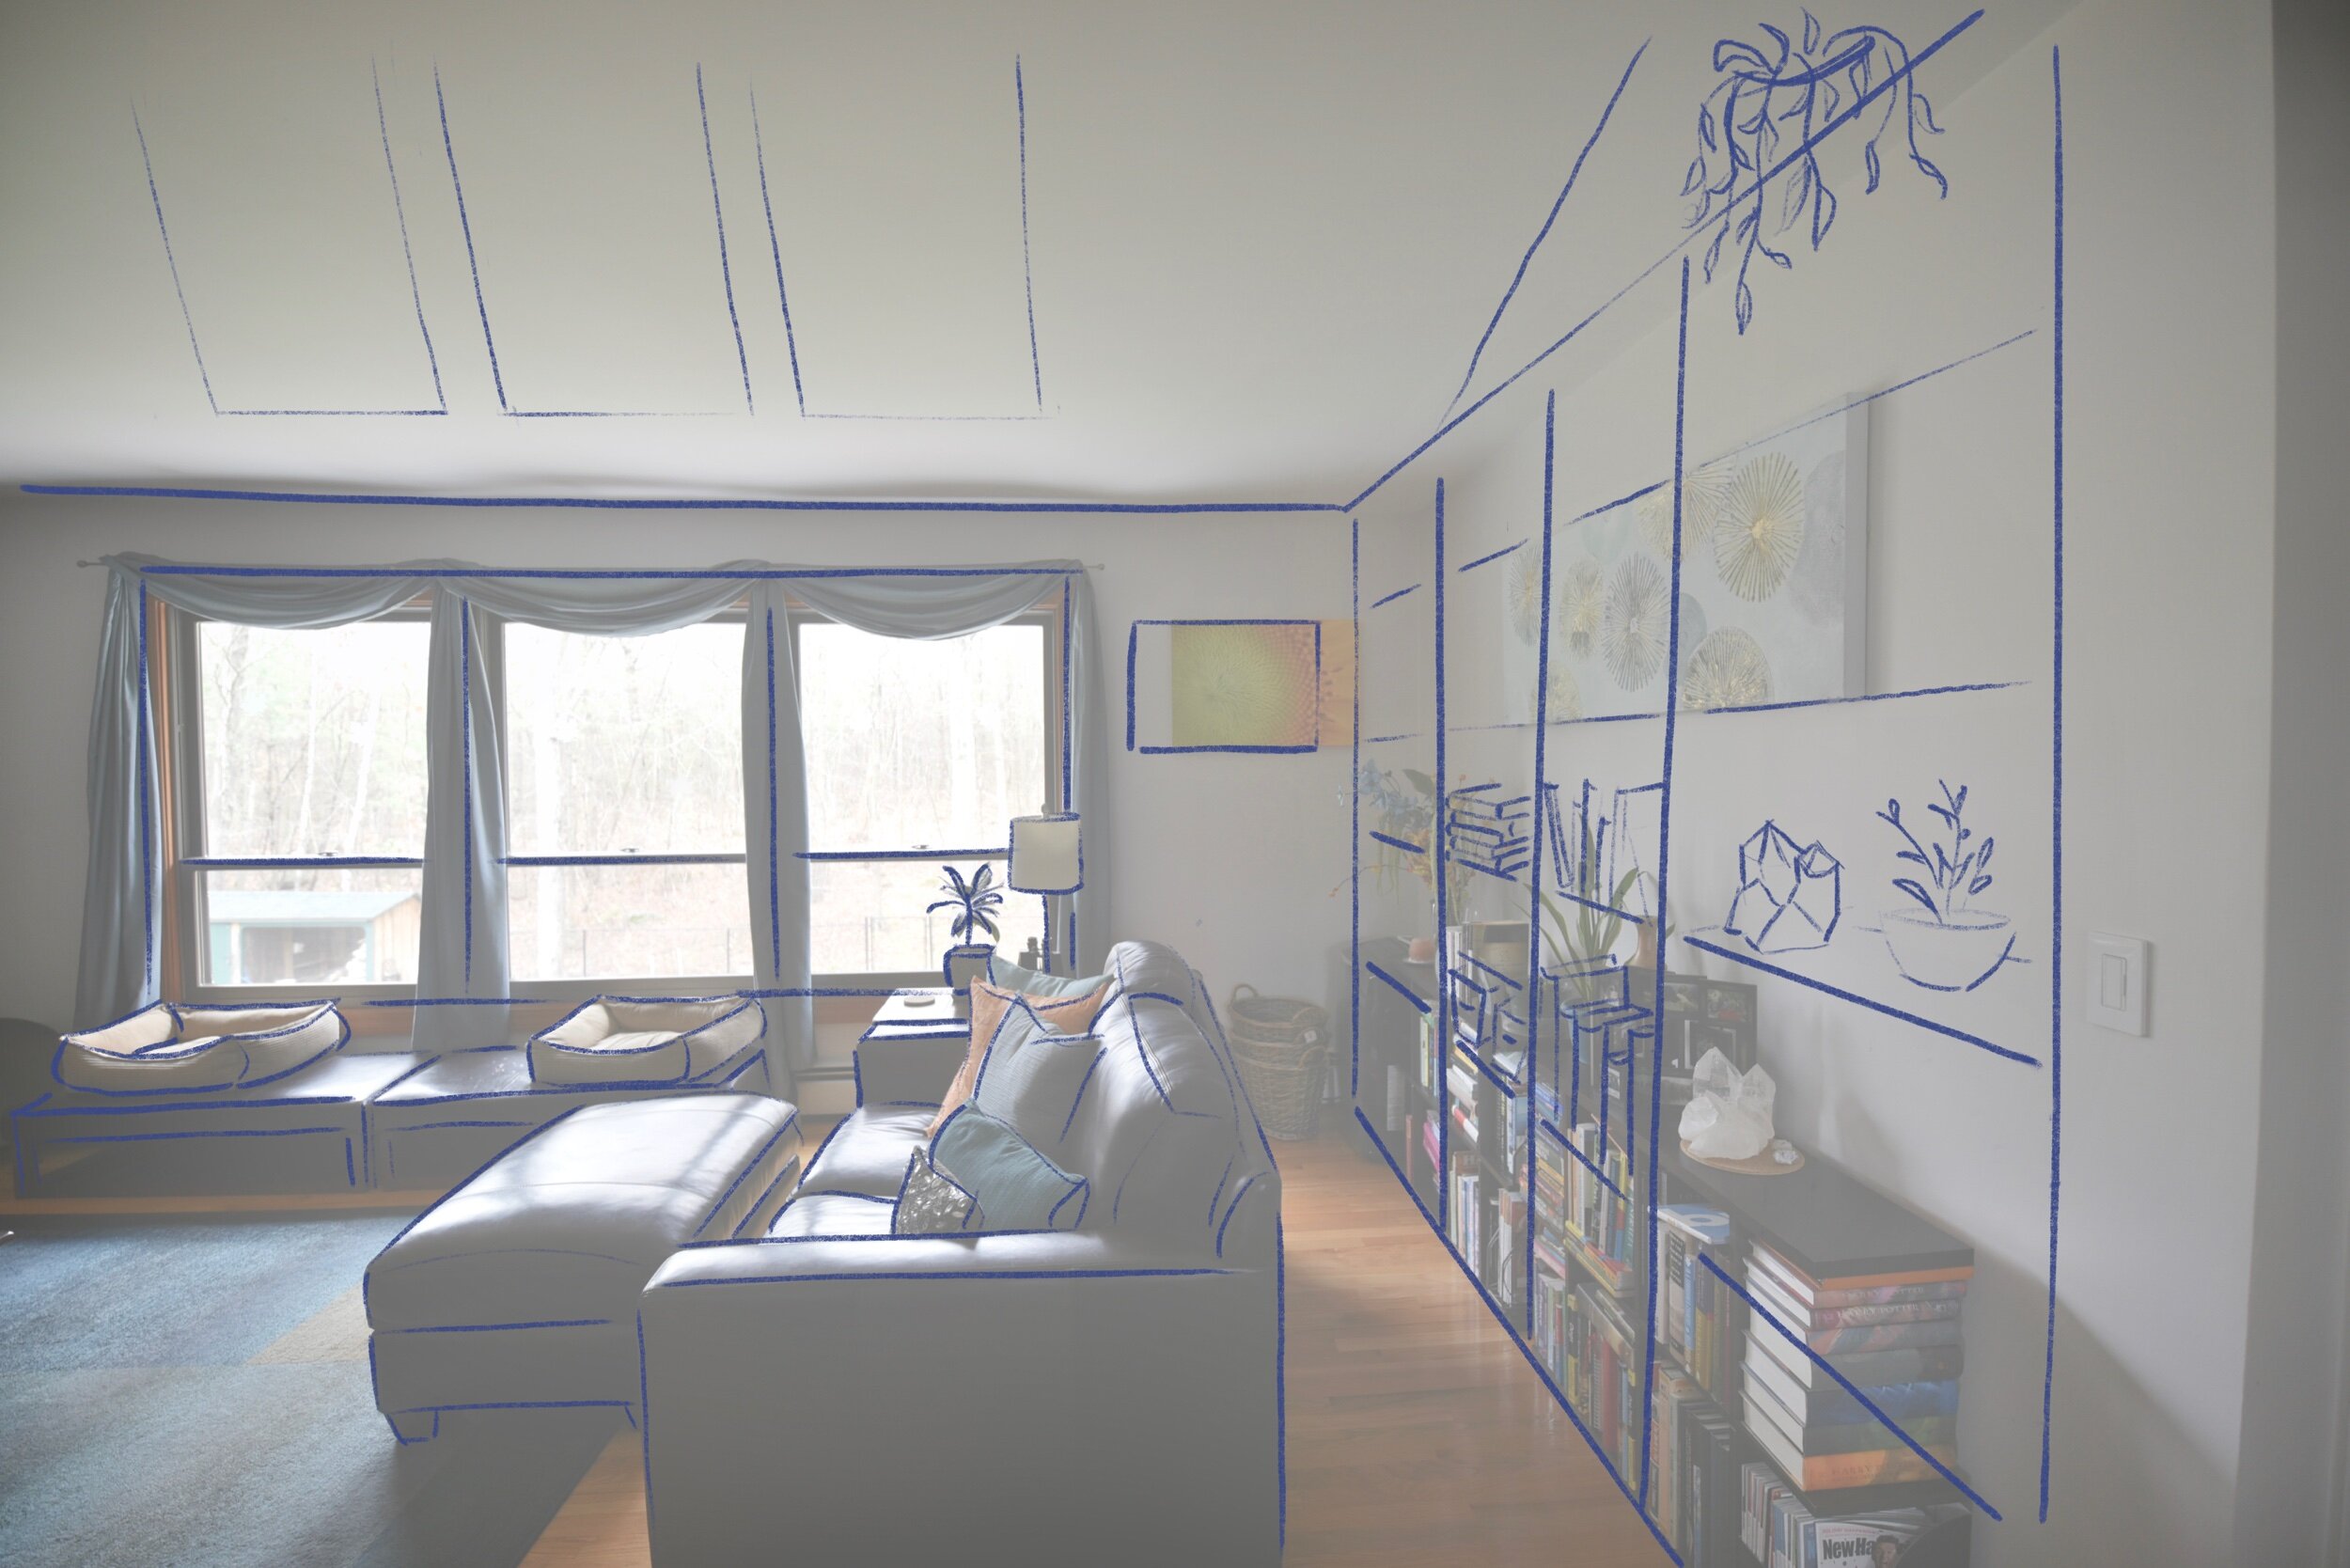
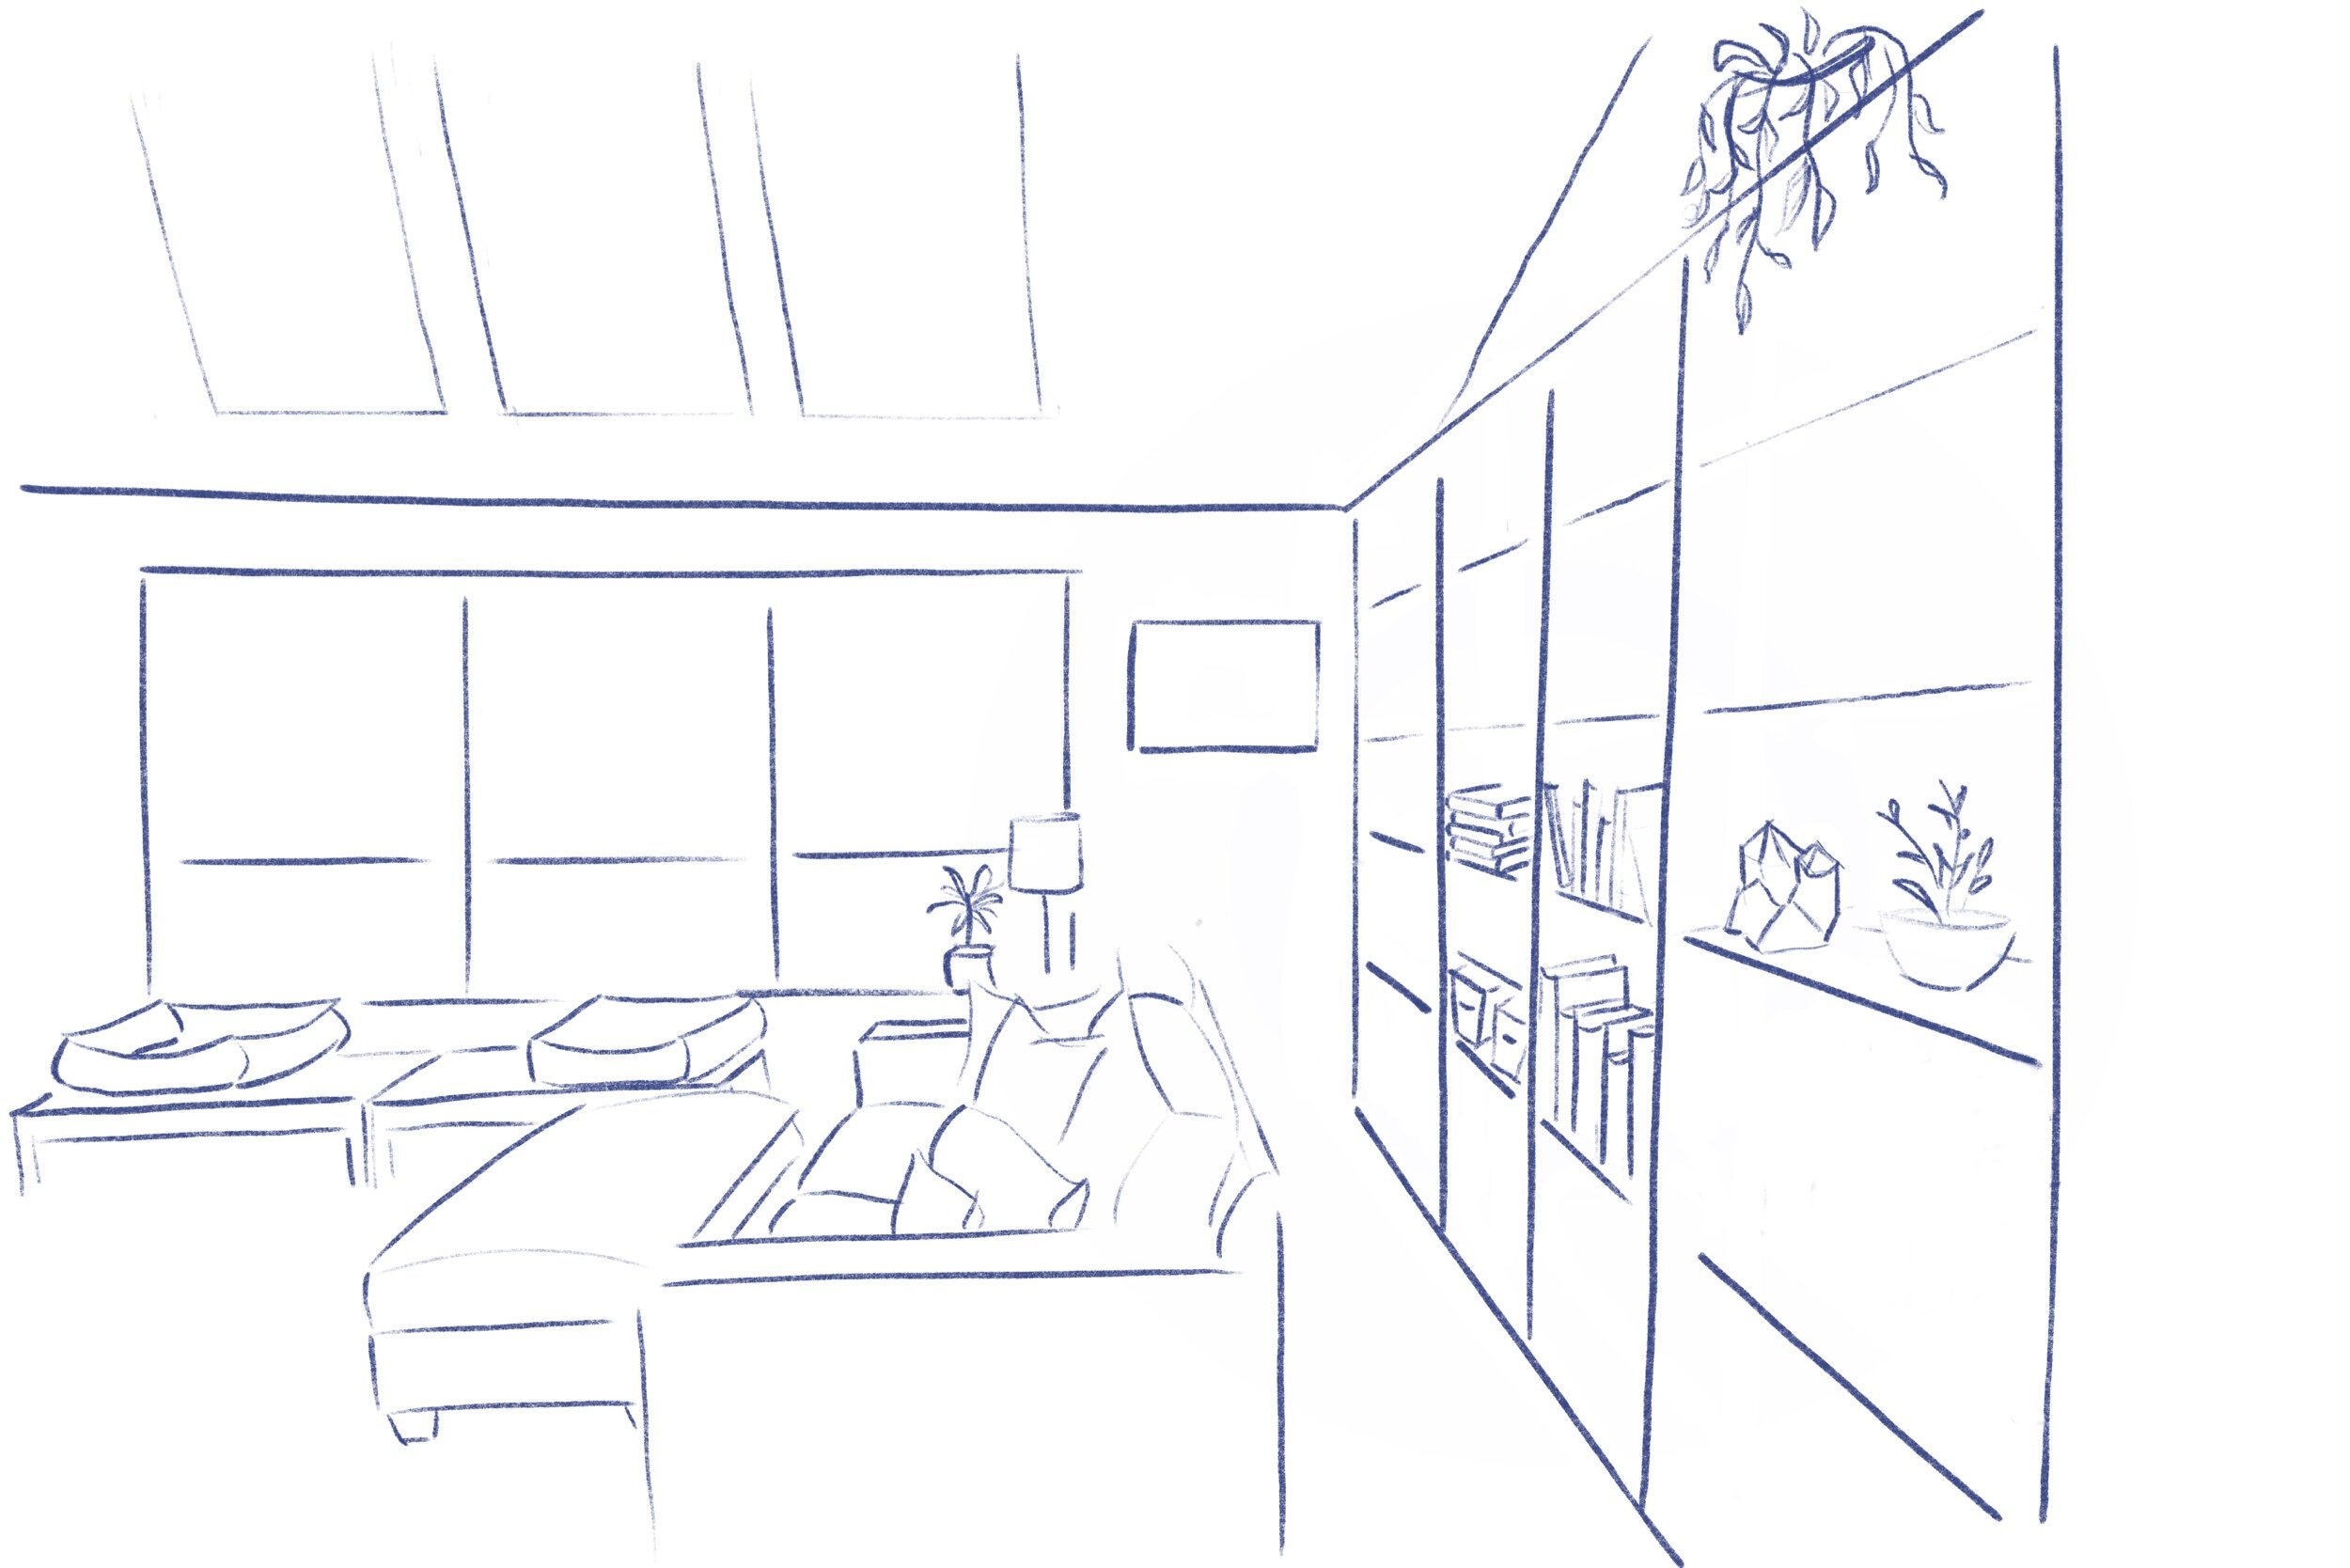
Living Room Bookshelf Wall
Floor-to-ceiling built-ins offer display storage and tighten up the expanse from love seat to TV.
My long living room begged for a floating love seat to shrink the TV-viewing distance, and I was left with a dead zone. The particle-board bookshelves that fit perfectly under the windows in my condo served the purpose in my new living room… until they didn’t. Stacks of books grew up the wall, just waiting to slide onto the floor. Time for a permanent solution.
Mockup
The back wall of the living room with sketch overlay of floor-to-ceiling bookshelves. (Also sketched is the fantasy vaulted ceiling with skylights, but that’s a project for another time.)
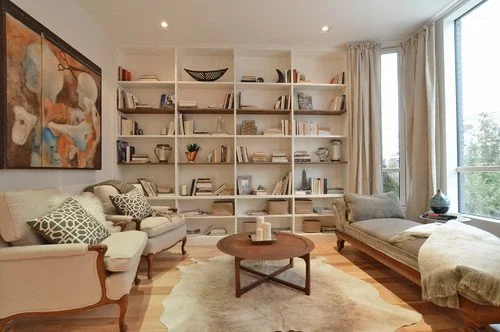
Inspiration Photos
Ideas that might work… keeping it simple, so the shelves disappear and allow the contents to be featured. I like the idea of lighting, but not enough to wire every shelf.
Tutorials
I’m not blazing new trail here, so I looked online to find tutorials. Here are some of the ones I leaned on:
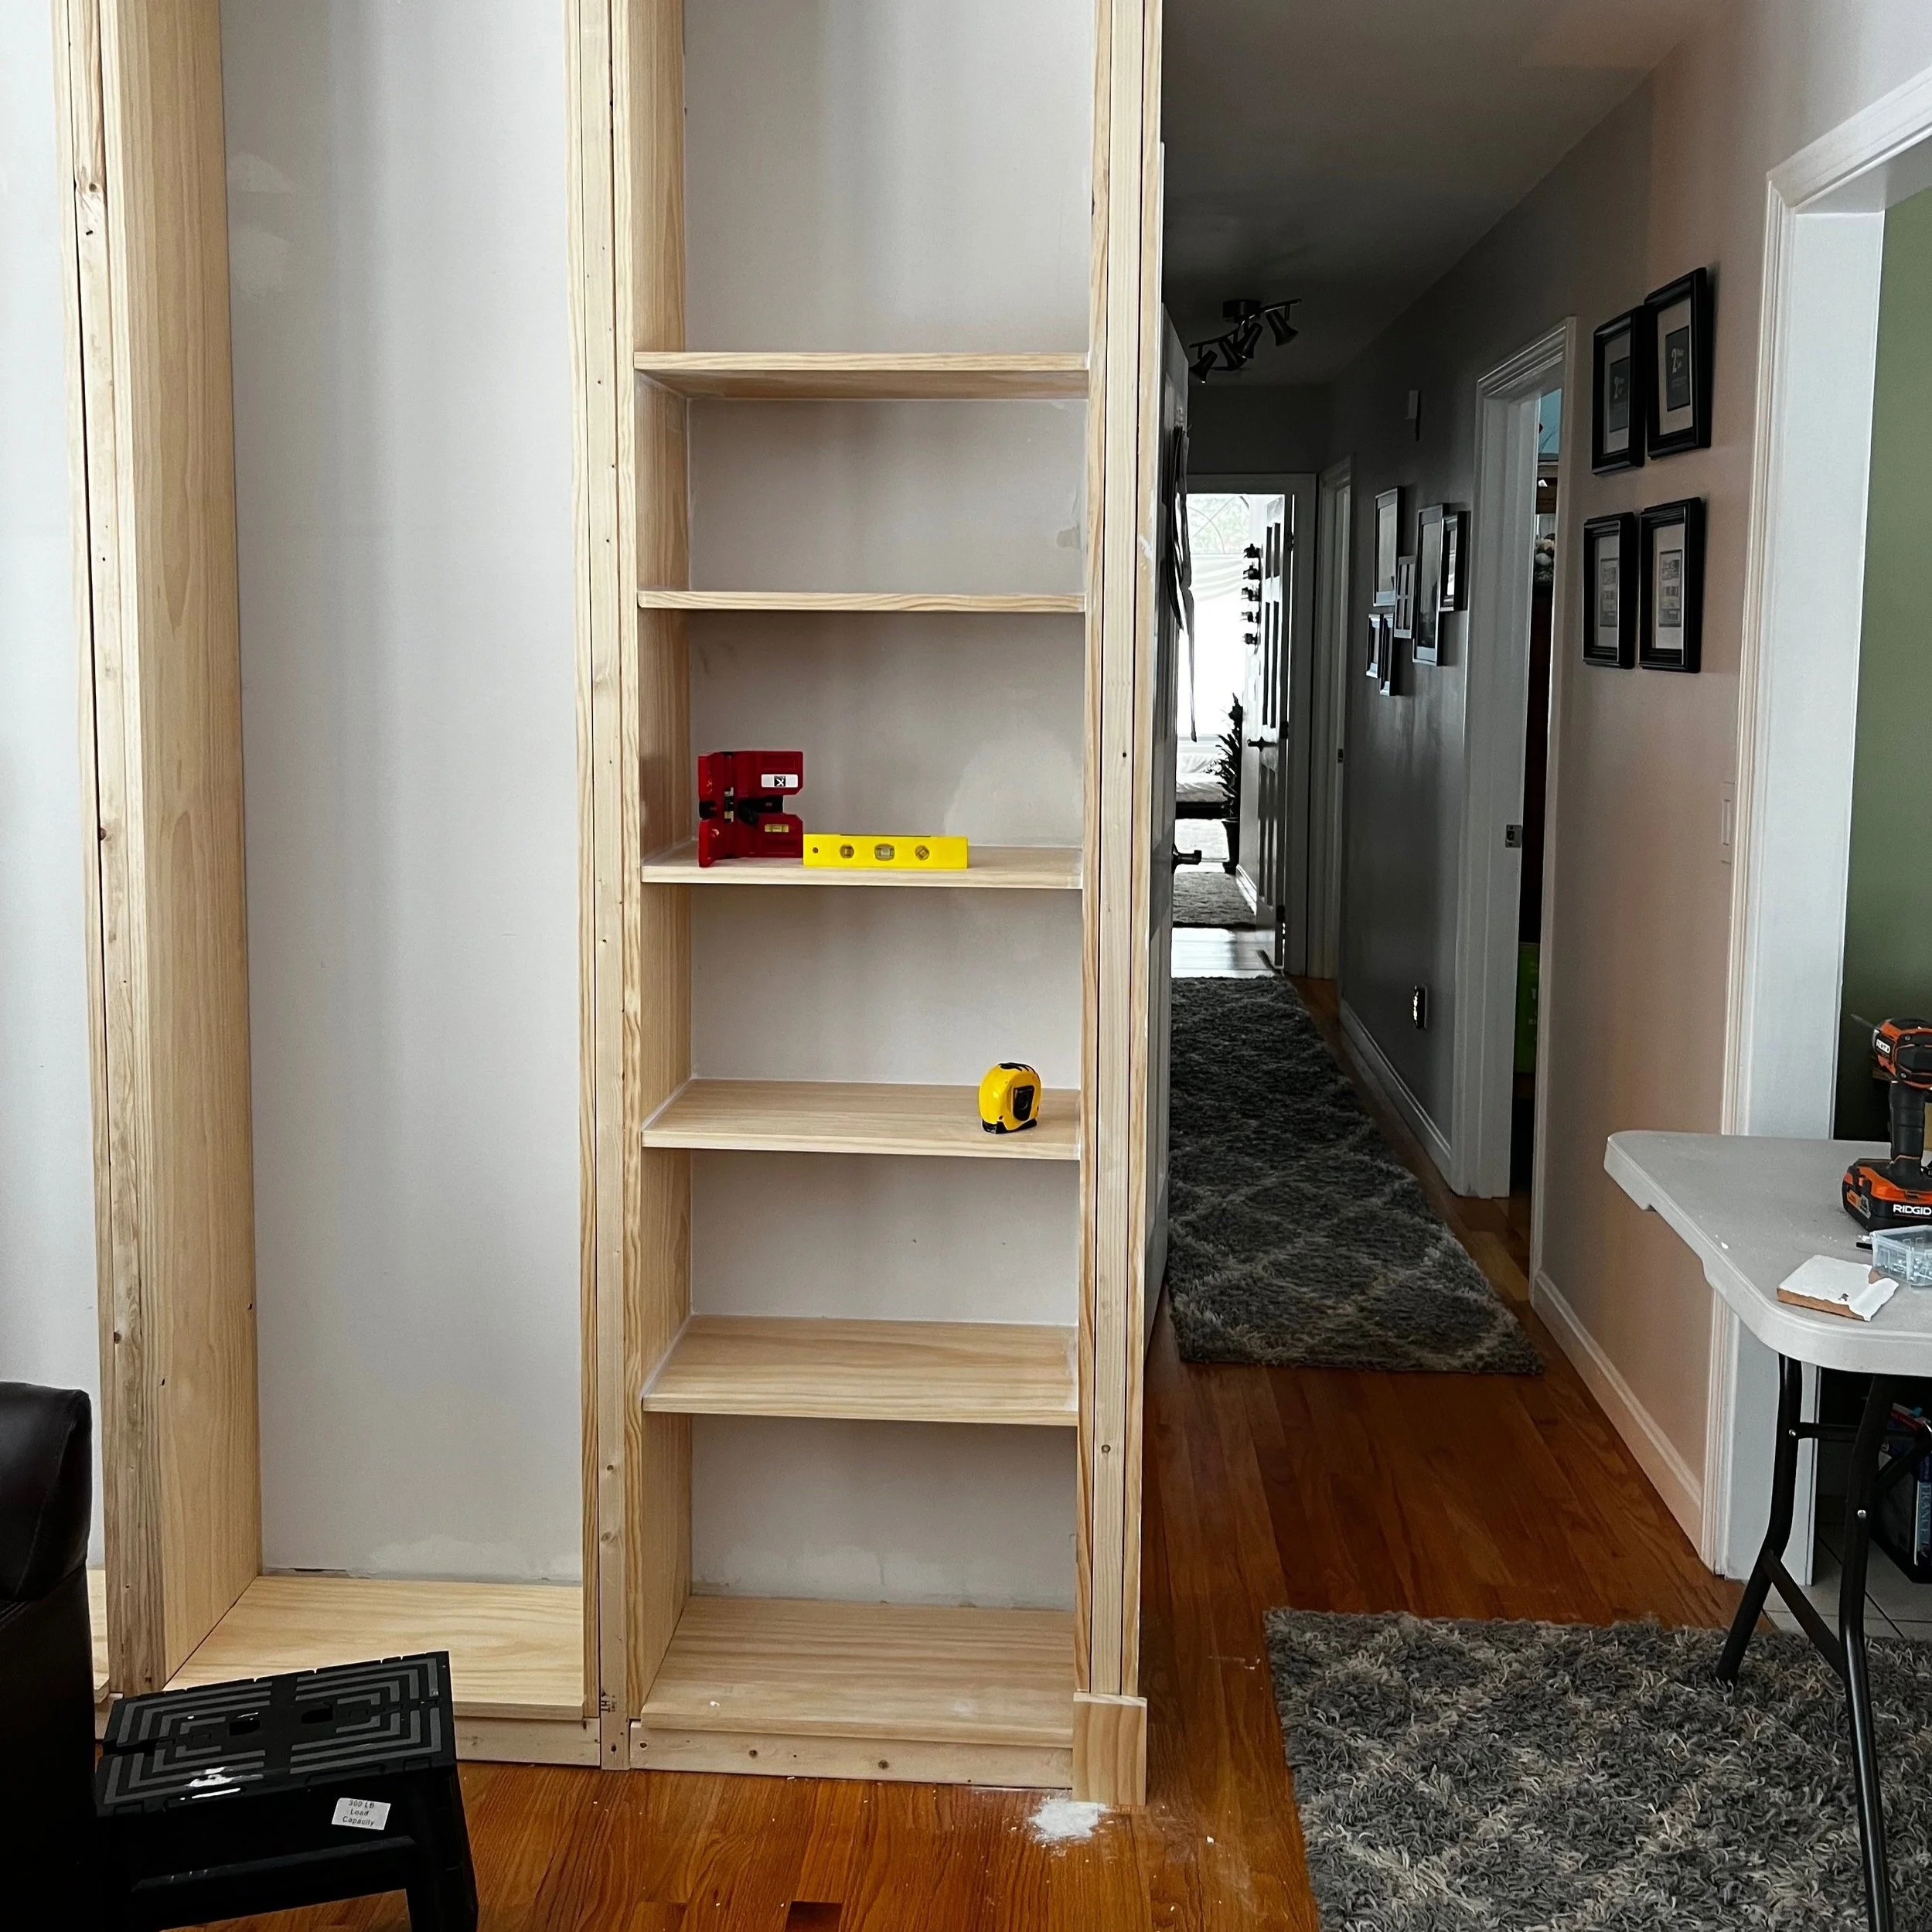
The Family Handyman: How to Build a Built-in Bookcase - I used this design for the boxed vertical supports, since the thickness gives the unit more substance. It also gives me space at the top to add picture lights.
Darbin Orvar: Built-in Bookcases and Cabinet Construction (part 1 and part 2) - I’ll use her approach of using the pocket hole jig to attach the shelves.


3D Model
I decided I wanted uniform, fixed shelves with picture lights across the top. I used Home Designer Suite to create the design. The wall is 126” wide. I’m planning on five 24-inch-wide sections, with the extra few inches used to accommodate the radiator and wiring on the left.
Side note: I had originally planned on installing a picture light at the top of each column. However, my chosen fixtures jumped in price by $50 each, so I reconsidered. Now that I see the completed project, I like it better without.


Getting Started
To prep the wall, I needed to remove the floor moulding and move the existing light switch to the inside of the stairwell. If I’d known how easy this part was, I’d have moved the switch years ago.


Since my vertical supports do not align with the wall studs, I installed a header board where the ceiling meets the wall. From there, I screwed in the vertical support spacers at 24” intervals.
I built up a platform to raise the bottom shelf up off the floor. The bottom shelf needed to be at least as high as the top of the floor moulding. I then started making sandwiches of the 2x2” supports and the 1x12” select pine boards, and screwing them to the pieces already attached to the wall.


Next: Shelves and shelves and shelves. Forty, to be exact… cut from 1x12” select pine boards and pre-drilled using a pocket-hole jig. Measured and leveled and squared again and again and again. Once they were perfectly aligned, I spackled the holes.
From bottom to top, the spacing measures 15”, 12”, 12”, 12”, 10”, 10”, 10”.


I mudded over the exposed end using joint compound, going slowly with thin layers to avoid cracking and sinking. I sanded between each layer, creating a nightmare of dust in my house… but I’m hoping it’ll be worth it. I added plain vertical trim to hide the sandwich-edge of each vertical support, and a horizontal piece across the top. The bottom will get floor moulding to match the rest of the house.
At this point I also got antsy to start painting. I know, I know… probably a bit premature. But it was fun to start seeing my vision appear. It also helped me see where I needed additional caulk to make up for my less-than-perfect carpentry skills.
I later heard the quote: Do your best, and caulk the rest!


It’s really starting to take shape now that it’s painted with Behr’s Crème de la Crème to match the living room, and loaded with a bunch of my books and knickknacks. I added rustic crates from Plow & Hearth to collect other odds and ends. I’ll have to wait until lumber is back in stock before I can finish the last of the shelves, but for now I’m quite pleased with how it came out.
Next up: clean up the gap where the shelves meet the ceiling, and elsewhere in the room where the ceiling joints have cracked and warped… which of course will lead to a ceiling re-paint!
Motor Time
I like having a motor on my sailboat. I appreciate the ability to drop the sails when the wind is too high, or too low… or to navigate the mooring field on my limited sailing skill. I don’t enjoy listening to it. Or buying gas for it. Or changing oil and spark plugs and all that.
Enter: Electric. Quiet and sun-powered.
Renogy 100w solar panel and charge controller kit (though I’ve now purchased a smaller 50w panel for the upcoming season)


Pond Planting
Pond installation is complete, and Maddox wasted no time helping herself to the cool, fresh water.
The construction left behind lots of loose dirt, which easily combined with summer hurricane rains to make a giant muddy mess. Decaying organic material in the sediment mixed with air in the waterfall to cause foam, but that was short-lived as the ecosystem came into balance.


Plantings are starting to fill in, and the patio is taking shape.

Night falls and autumn leaves


Pond Installation
The Concept
Summer 2019
I love the idea of a backyard plunge pool where my fur babies and I can go for a dunk on a hot day. But since New Hampshire doesn’t have a majority of hot days, it seems silly to install a pool. So… why not a water feature I can enjoy most months, even when it’s too cold to swim? I’d like the water surface to be maybe 10’ x 15’, 3-4 feet deep… enough for dogs to plunge, and for me and a friend to relax with a couple of tropical beverages. And it won’t look like a tarp-covered hippopotamus all winter long.
Other requirements:
Most important: sloped egress for the dogs… drowning hazards are no joke.
Integrated landscaping… I know it might not look like nature put it there, but it should look like it fits in.
No loose sand/mud for wet dogs to track in the house.
Waterfall for soothing white noise.
Low-ish maintenance. I can handle skimmers, chemicals, and seasonal maintenance… but nothing that I have to keep alive (e.g. fish).
Maybe: ambient lighting?
Now I’m really starting to collect ideas. And searching through online tutorials figuring out how much of a pain in the butt this is going to be.
THE CANVAS
Spring 2020, A.K.A: “Before”


Ideas
I’m envisioning the pond and waterfall built into the existing slope. The ferns are in the back corner of the lot. I’m sure the fir tree will be in the way… that can easily be removed. Actually, any of the plantings in this corner can be yanked out… the bushes obscure some boulders that stabilize the corner. There is an irrigation line that I’ll have to deal with.


Instructional* Videos
* Not to be confused with thinking I can do this alone.
VISIT TO THE POND SHOP
July 2020
Maddox and I headed out to Chester Hollow Water Garden for a socially-distanced tour of the fountain-studded grounds.


Making it Happen
July 2021
It’s been SO HARD to wait, especially through the heat waves New England has already experienced. But the time has come: I’m getting a pond. Correction: Maddox is getting a pond. 💖
Charlie from Chester Hollow Water Gardens visited my property to get an idea of what I want, and to formulate a design. We walked and talked and pointed and I tried to envision what he will build for me, but I probably won’t be certain until it’s actually in place. Of this I am certain: it’s going to be gorgeous.
Maybe something like this? Except better.
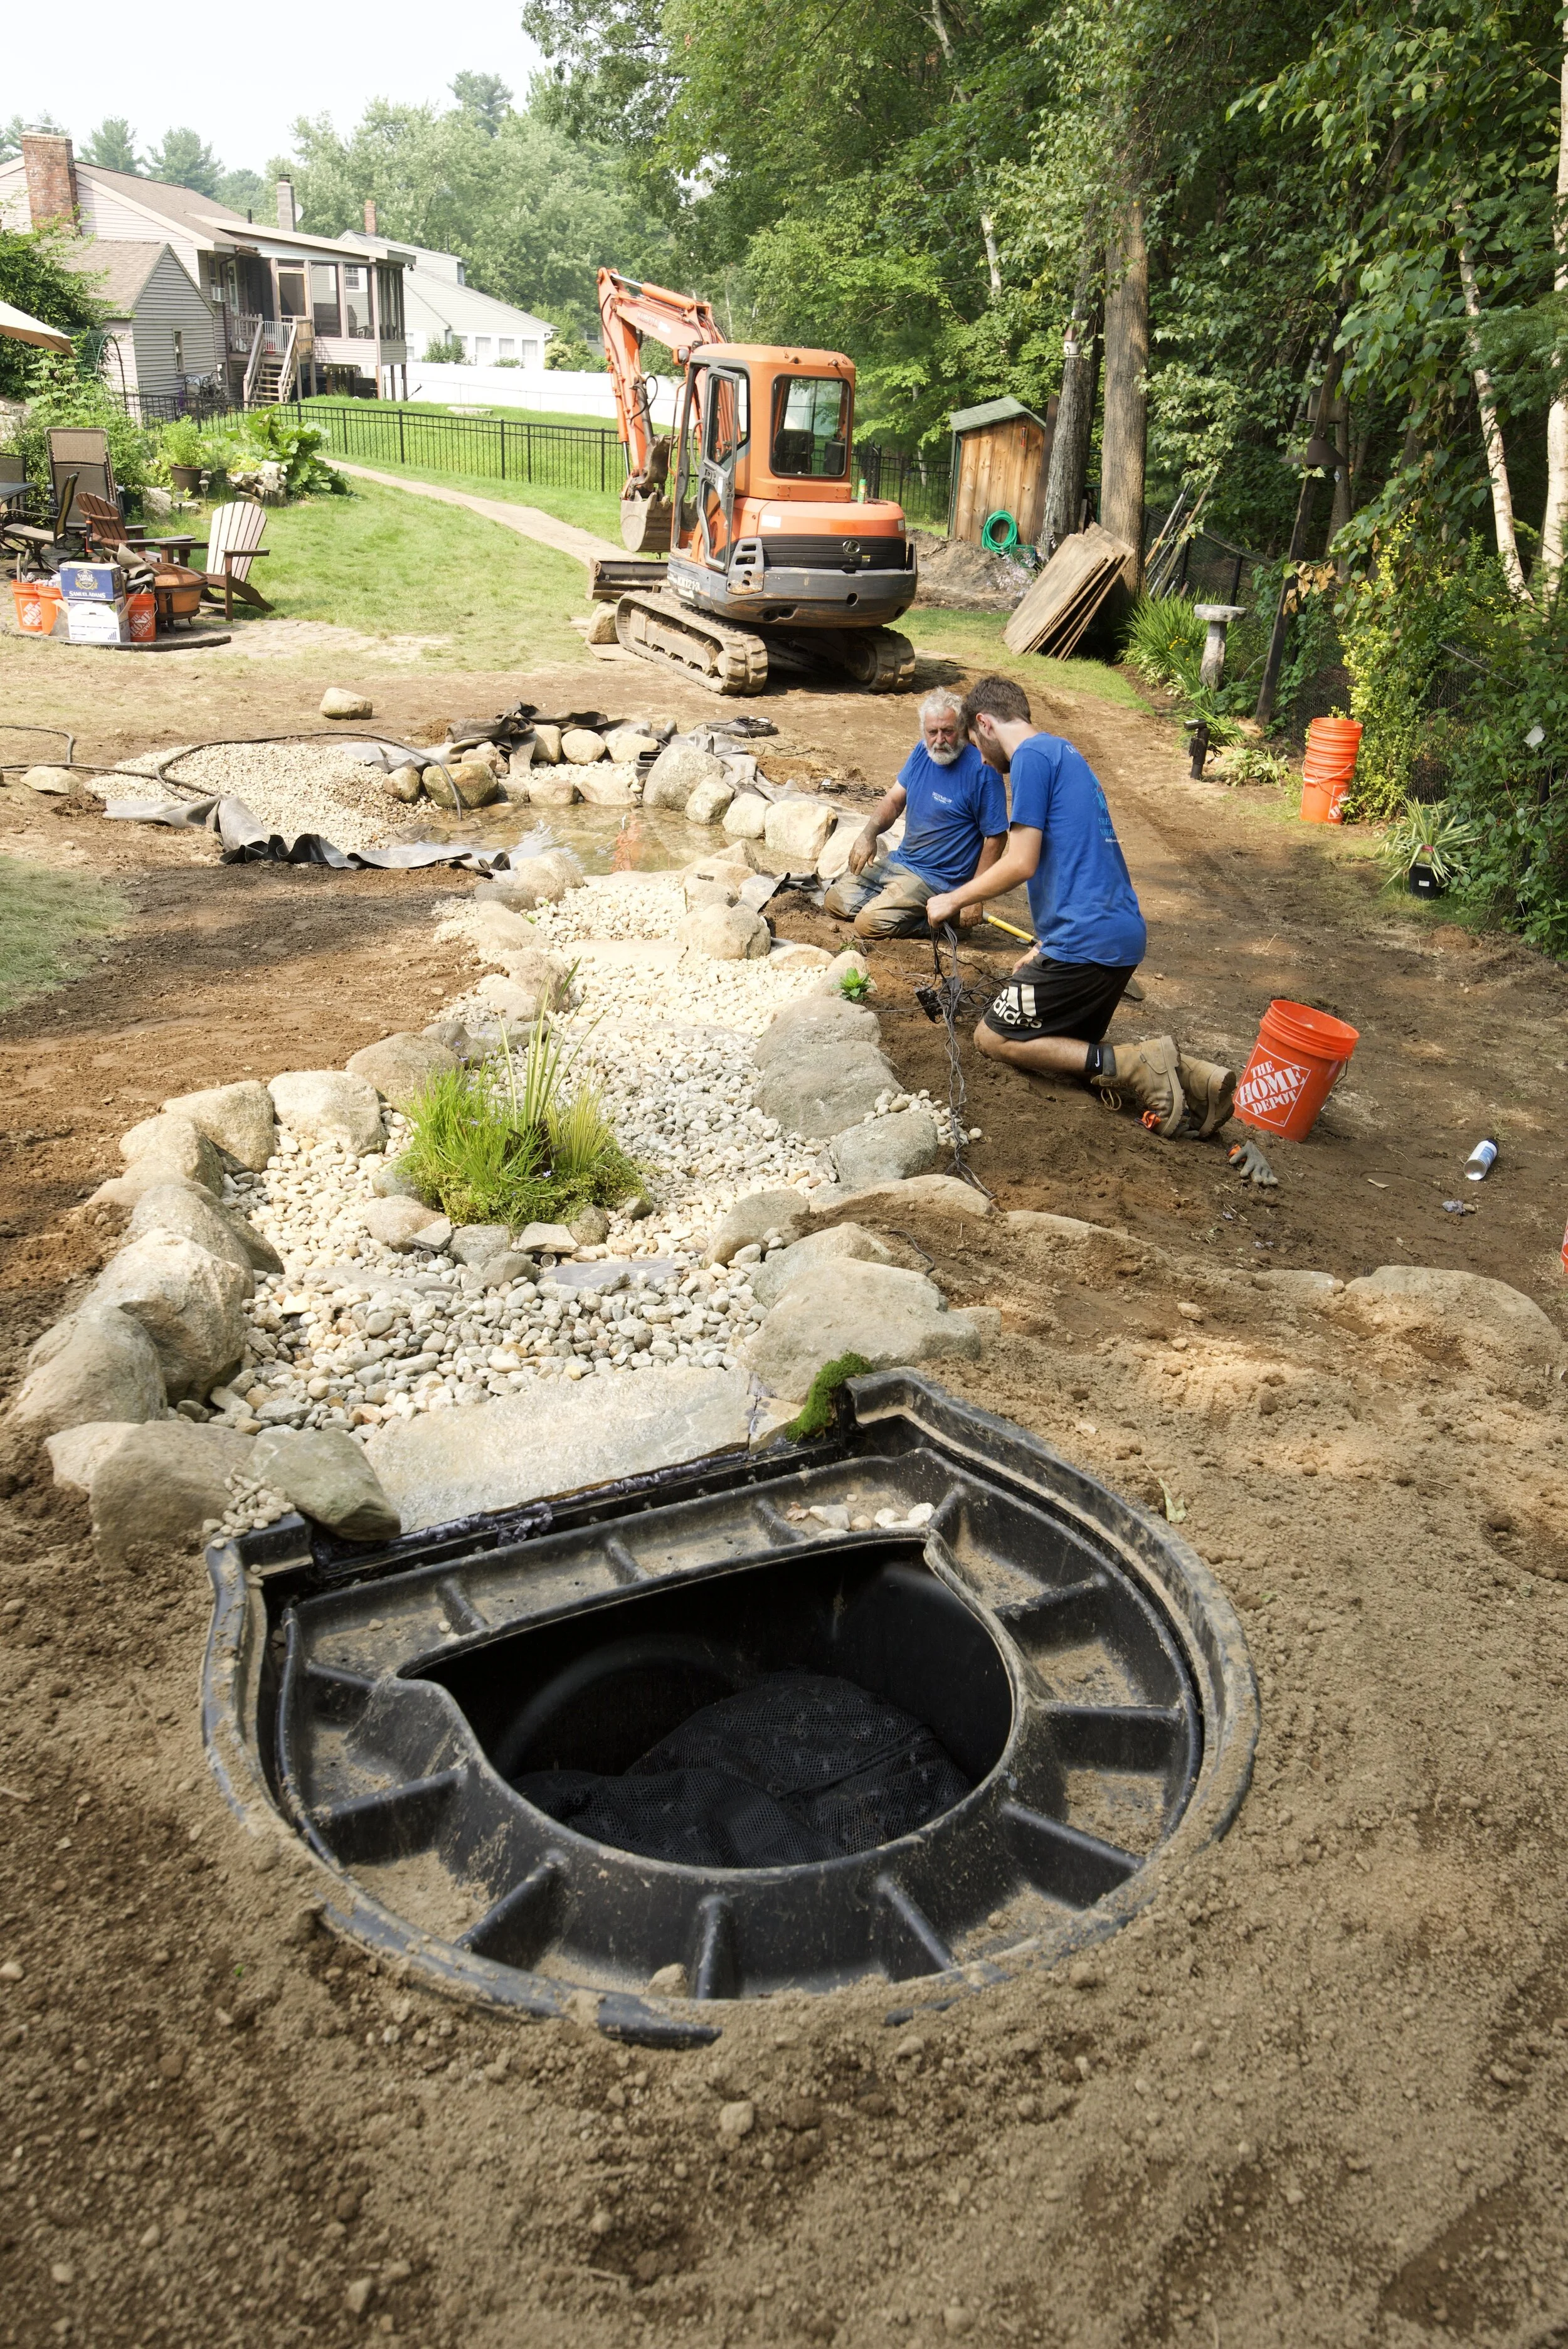
Pond Equipment
Here are the highlights of what went into my pond construction, all by AquaScape.


digging and Building
Click open each picture to see it full-size and read descriptions.


Now that the installation is done, it falls to me to plant and dress the edges. I have my work cut out for me!

Wisteria Blooms
A spectacular show four years in the making.
I’m so pleased with this find… a tree-form wisteria with long elegant racemes of fragrant flowers. It’s taken a lot of patience and tender loving care, but the results are well worth it.


May 23, 2021: AMAZING!


Carport Clutter
Getting the carport clutter organized and contained.
“Only entropy comes easy.” — Anton Chekhov
Yeah, I feel that. My carport shelf was intended to make things neat, but it did the exact opposite… it became a magnet for clutter coated with pollen and grime.
Even the most organized pile of junk is still a pile of junk.

The first step in any worthwhile cleaning project is to turn a mess into an even bigger mess.

Okay, I take it back. The first step is actually online shopping. However, problems arise when you discover half-way through the project that the purchased item is defective, and you then have to look at this pile of junk in your parking space for a few weeks while a replacement arrives.
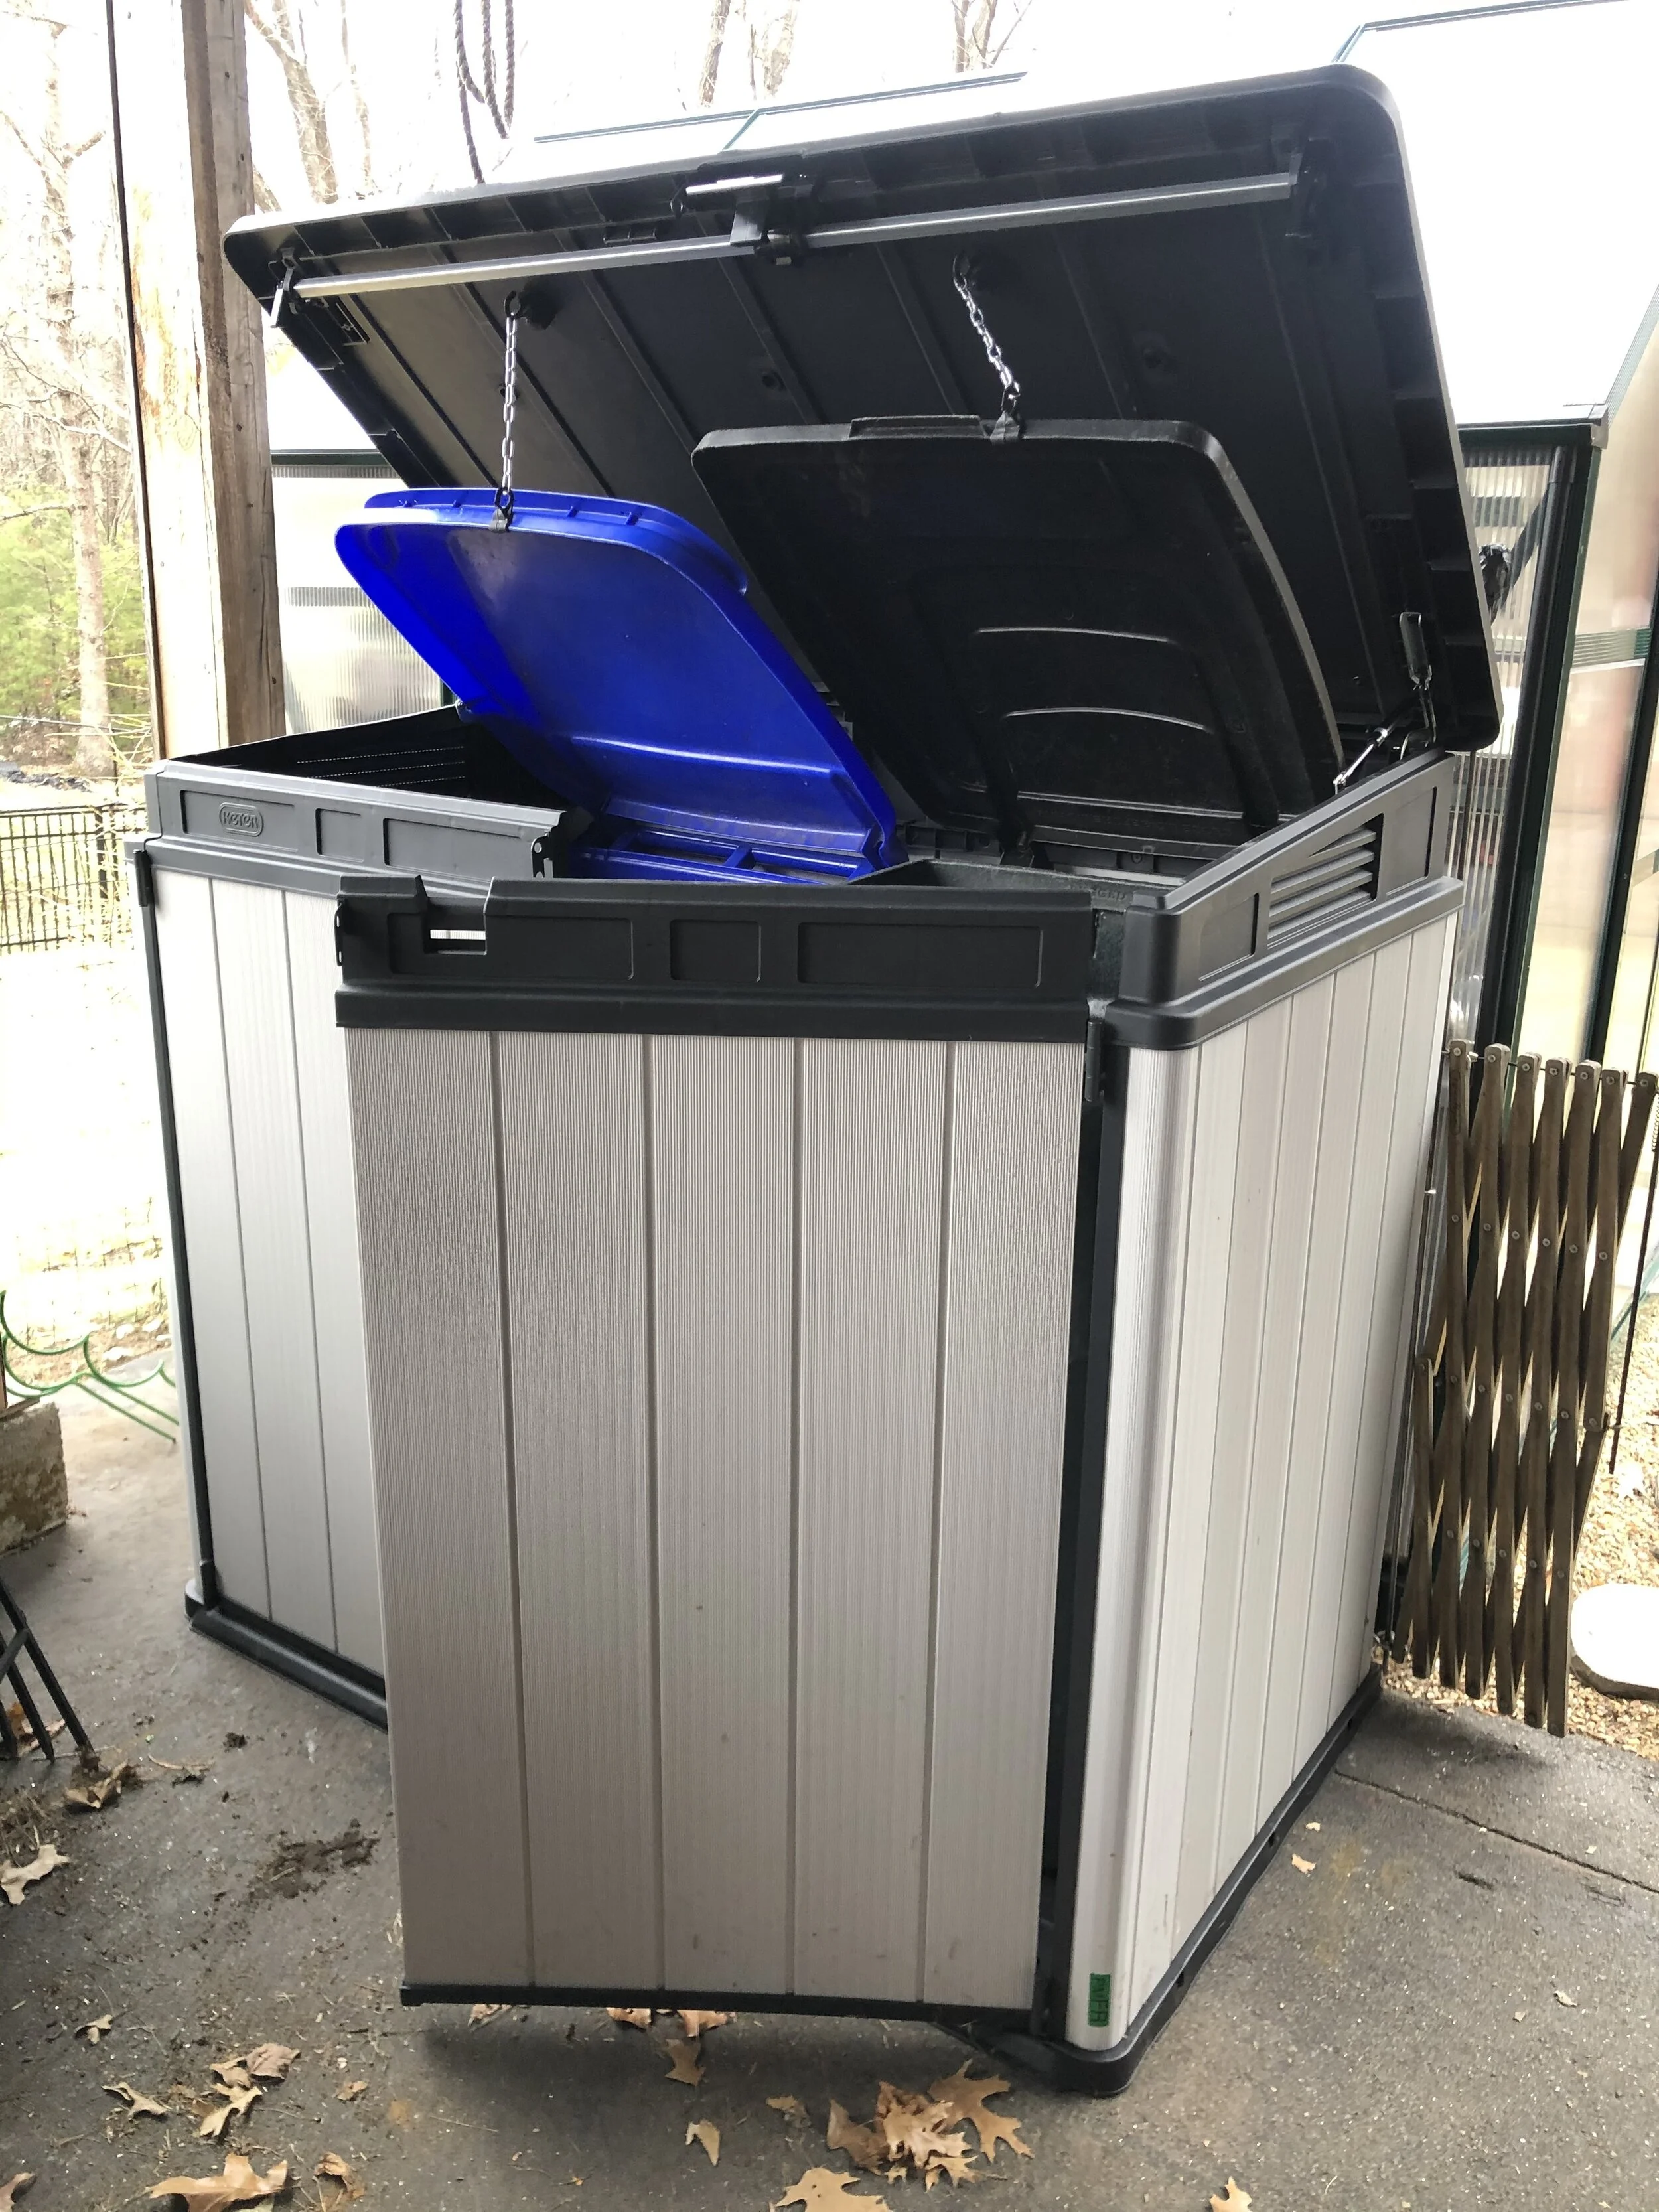

Garbage enclosure assembled! Just one catch: my existing garbage bin is too big by about half an inch. Luckily I have a neighbor willing to trade their square-footprint bin for my rectangle-footprint bin.
Crisis averted.

With storage units assembled, the next step is to install shelves. No one shelf can hold too much, since the L-bracket supports are screwed into pretty thin plastic. But it’s plenty strong to hold what I need it to hold.

Nice and tidy!

Time to Repair Leaky Windows
Last summer brought so little rain that I didn’t realize until October that the window seals had eroded. The first fall rains seeped into the cabin and soaked the interior cushions.

Rubber seal along the top of the window had turned brittle and weak.

Well, SHIT. The narrow top and bottom edges peeled away easily, but the plexiglass extends several inches beyond the window opening, and was secured with thick rubbery glue. Snap!

Scraping away the old sealant.

Cleaning the sealant off the glass also meant removing the black backing.

I’m not sure this the advised approach, but it’s what I’m going with for now: SPRAY PAINT.

A little epoxy, a little spray paint… not perfect, but good enough for now.
Well, all in all that went pretty terribly. I decided that for the other window, I’d simply run a bead of clear outdoor silicone sealant around the outside… not a permanent solution, but it’s all I have in me for now.